Tutorial 6 - Configuring Passkey
What are we doing?
In this tutorial, we use our Keycloak Custom instance and enhance it to support passkey. First, we create a new realm tutorial_passkey and within it a client client_passkey. Next, we create a registration flow called registration-passkey that allows users to register their accounts with either passkey or password. Then, we create a new authentication flow called browser-passkey that allows users to sign in with either a passkey or a password.
Registration
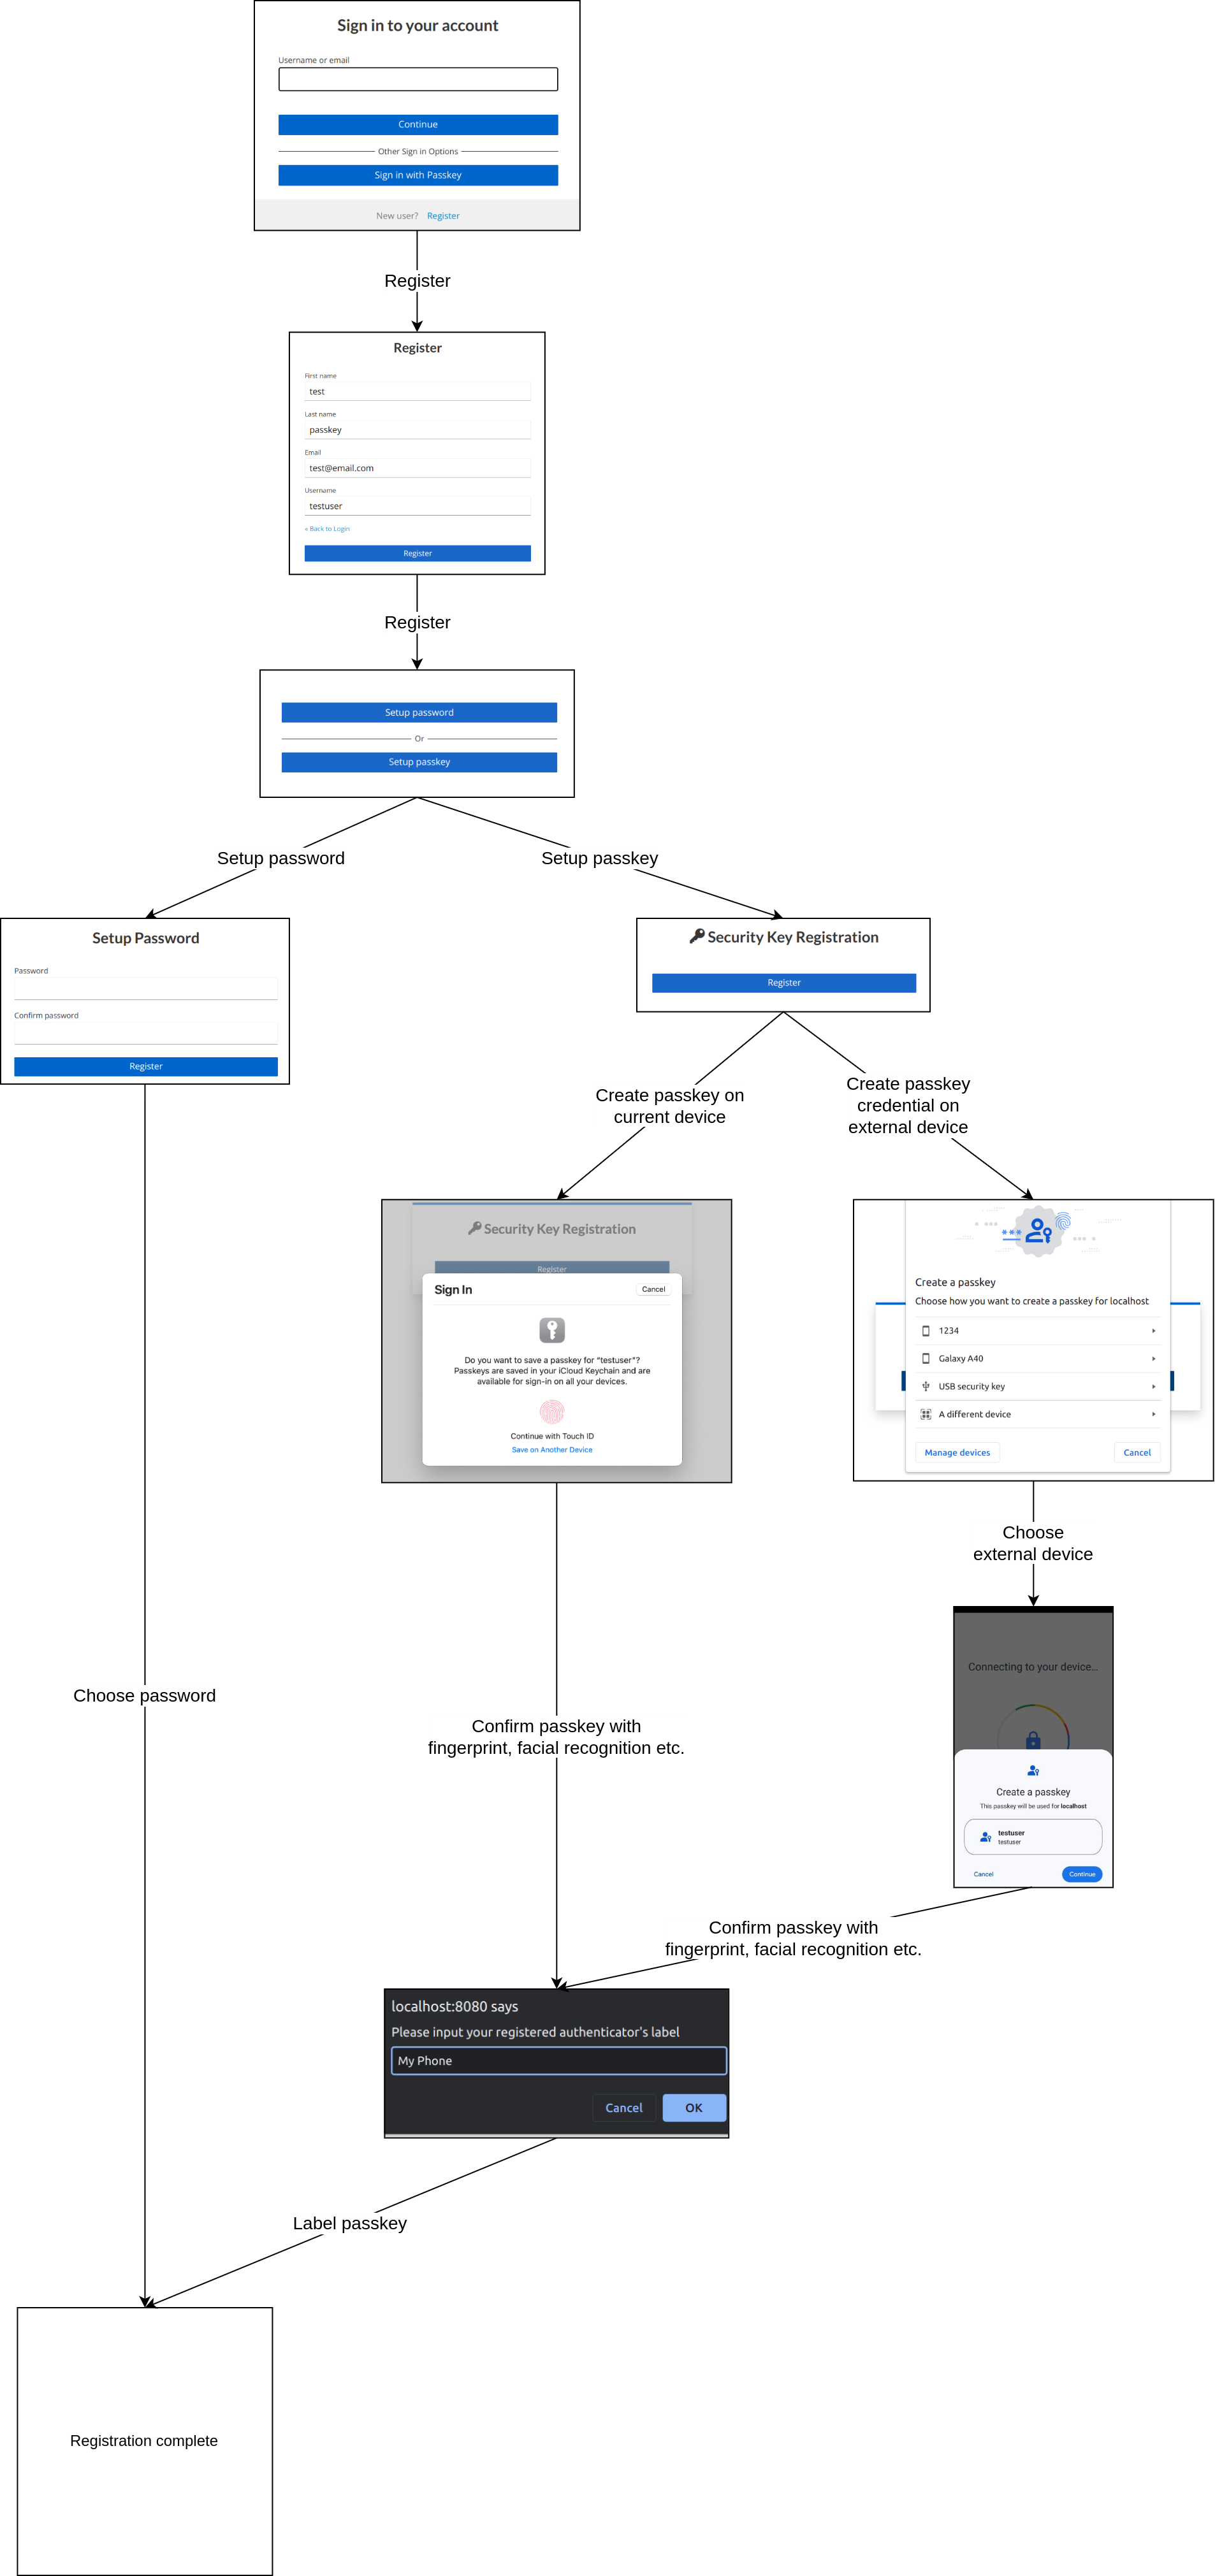
The user can choose whether to set up a passkey or password for their user account. Password setup requires you to enter a password to complete the registration process. The passkey setup provides two options for creating passkey credentials:
- Create a passkey on the current device. This requires that the current device supports passkeys.
- Create a passkey on an external device. This requires:
- Current device can be used as client in Cross-Device Authentication.
- External device can be used as authenticator in Cross-Device Authentication.
Check the compatibility matrix to see if your devices can be used. The registration process is completed once the passkey has been labeled.
Authentication
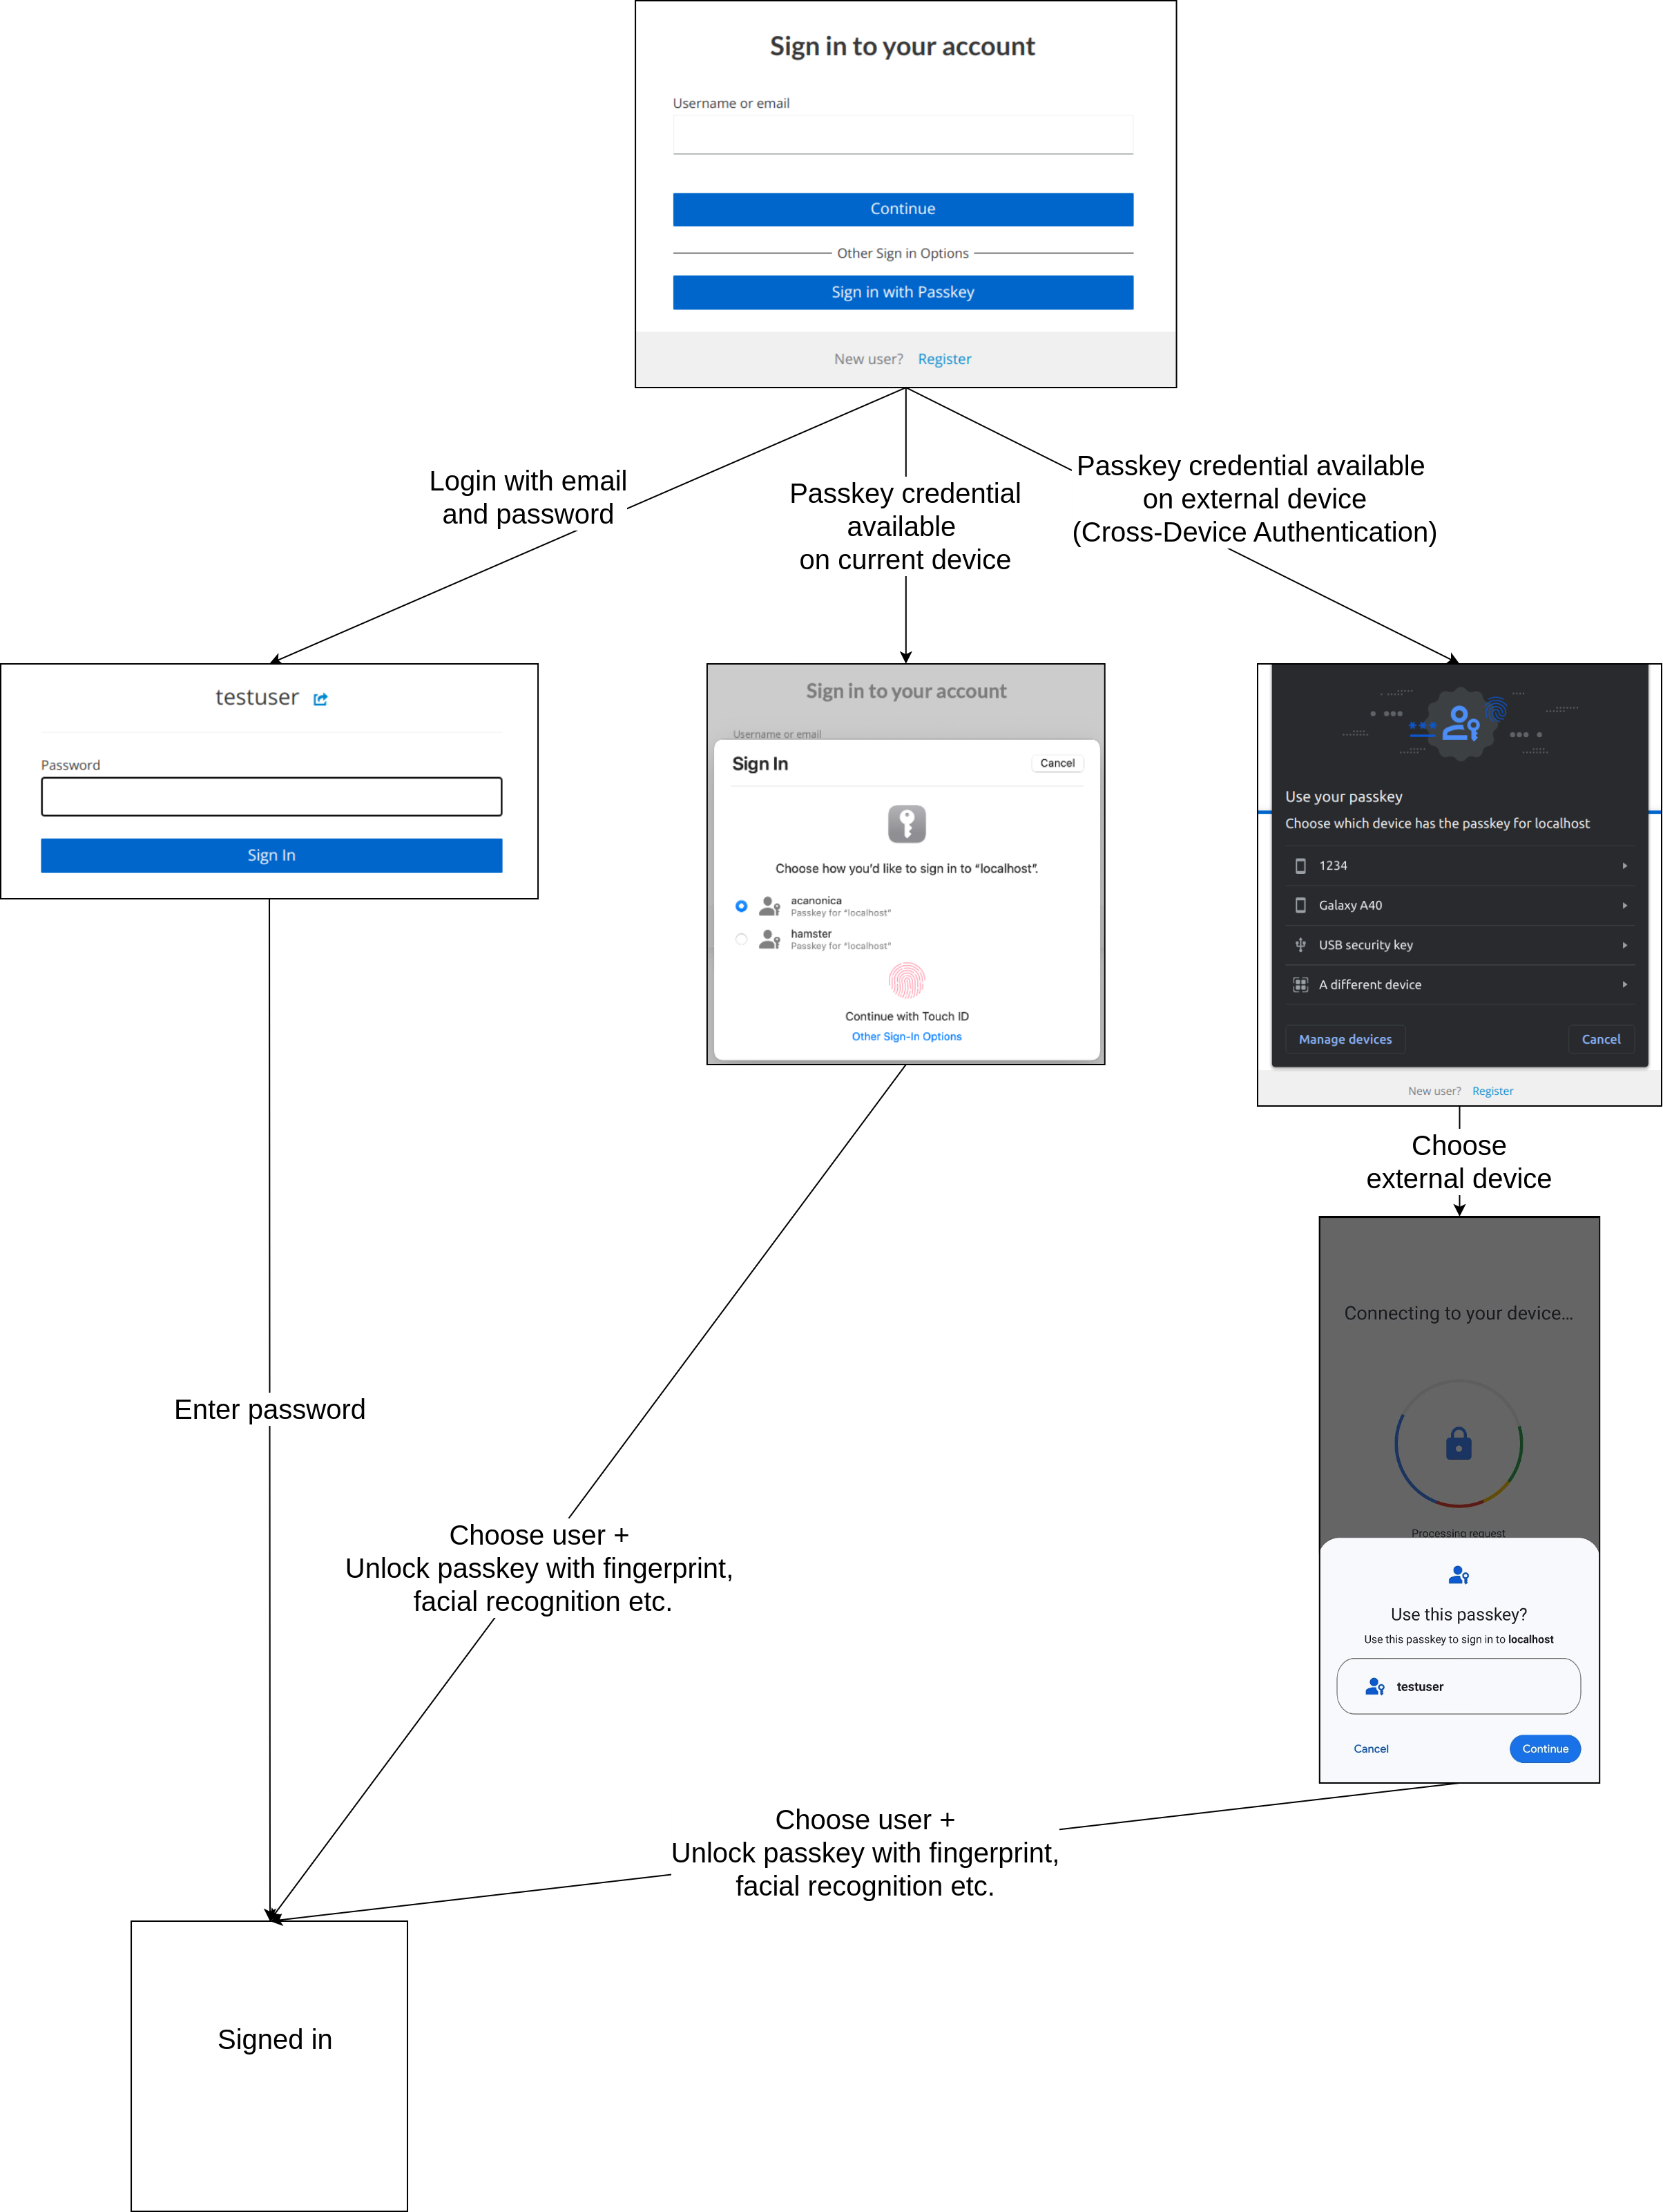
The user can choose whether to sign in with passkey or password. To sign in with passkey, the user clicks on the button Sign in with Passkey. Two options are provided:
- Choose a passkey available on the current device.
- Choose a passkey available on a external device. This requires:
- Current device can be used as client in Cross-Device Authentication.
- External device can be used as authenticator in Cross-Device Authentication.
Check the compatibility matrix to see if your devices can be used. The authentication process is completed once the chosen passkey has been successfully unlocked.
Why are we doing this?
“Passkeys are a password replacement that provide faster, easier, and more secure sign-ins to websites and apps across a user’s devices. Unlike passwords, passkeys are resistant to phishing, are always strong, and are designed so that there are no shared secrets.” - FIDO Alliance.
Passkeys are also known as multi-device FIDO credentials and aim to make FIDO authentication more usable and available to users. Passkeys are a new option for users to access FIDO sign-in credentials on multiple devices and even across platforms. A single passkey credential identifies a user account on an online service. Major tech companies, such as Google, Microsoft and Apple, already adopted passkey on their respective platforms. Passkeys can be synchronized on their respective platform services such as iCloud Chain (Apple) or Google Password Manager (Google) and retrieved from other passkey-supporting devices connected to the same account. With Cross-Device Authentication, passkeys available on one device can be also used to sign in on another device. For example, you can sign in from your macOS computer to an account whose passkey credentials were created on your Android phone.
FIDO authentication is enabled through WebAuthn, which is a web-based API. The WebAuthn standard is a universally accepted W3C specification. WebAuthn uses public-key cryptography for authentication, which uses a pair of cryptographic keys: a public key and a private key. The private key is stored on the user’s device, such as a hardware security key, smartphone, or any device with a trusted platform module, while the public key is stored on a server. Databases are no longer attack targets because public keys are useless without the corresponding private keys.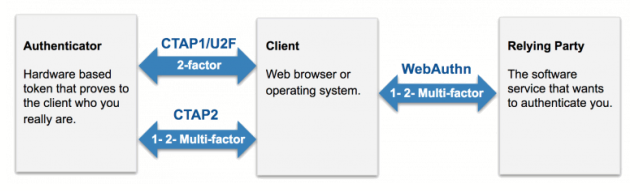
WebAuthn/FIDO2 standards enable strong and even passwordless authentication between servers, authenticators and browsers.
Requirements
To complete our tutorial you need:
- Operating System and Browser with Passkey support.
- Install the following components:
- Java JDK 11
- Maven
- Docker Host
- jq
Steps
The steps of this tutorial are grouped around the implementation details of the passkey extension.
- Step 1: Overview provides insight into the structure of the passkey extension and the corresponding configuration adjustments in Keycloak.
- Step 2: Registration provides a detailed explanation of each custom step in the registration flow.
- Step 3: Authentication provides a detailed explanation of each custom step in the authentication flow.
To see the up & running result of the custom Keycloak with passkey support, follow the Quick Start section. This is followed by step-by-step instructions on how to register a user account with passkey and also how to sign in.
Quick Start
Please create your own new custom Keycloak project by either cloning or forking the Keycloak-Custom GitHub repo. Checkout the tutorial-passkey branch.
Then open the new repository with your favourite Java IDE. For the IntelliJ IDE, we provide ready to use run configurations. Please refer to our Keycloak Custom Tutorial for more details about each module, as the focus of this tutorial is solely on passkey.
As for all projects based on our custom Keycloak template you need to execute the following 4 commands:
./mvnw clean packagedocker-compose -f ./docker-compose/postgres/docker-compose.yml up./server/run-keycloak.sh./server/run-keycloak-setup.shUser Interaction
If you want to see the result from a user perspective, you can use the testing application provided by Keycloak on their website: https://www.keycloak.org/app/. It is worth noting that you have to change the realm to passkey_tutorial and the client to passkey_client as shown below:
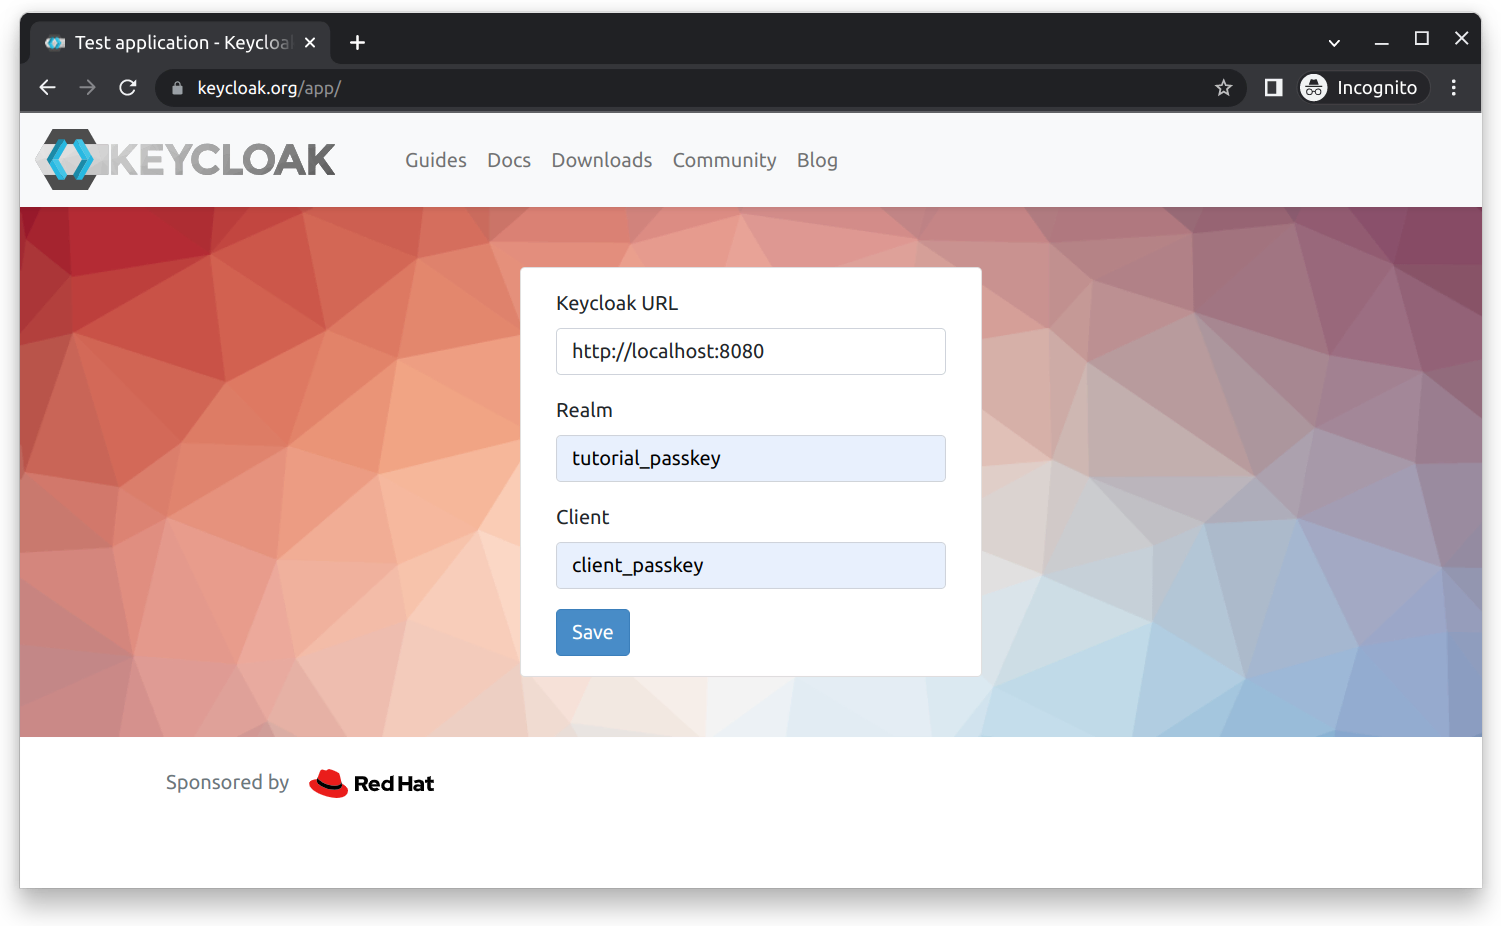
After clicking the Save and then the Sign in button, you should see the login page as shown below:
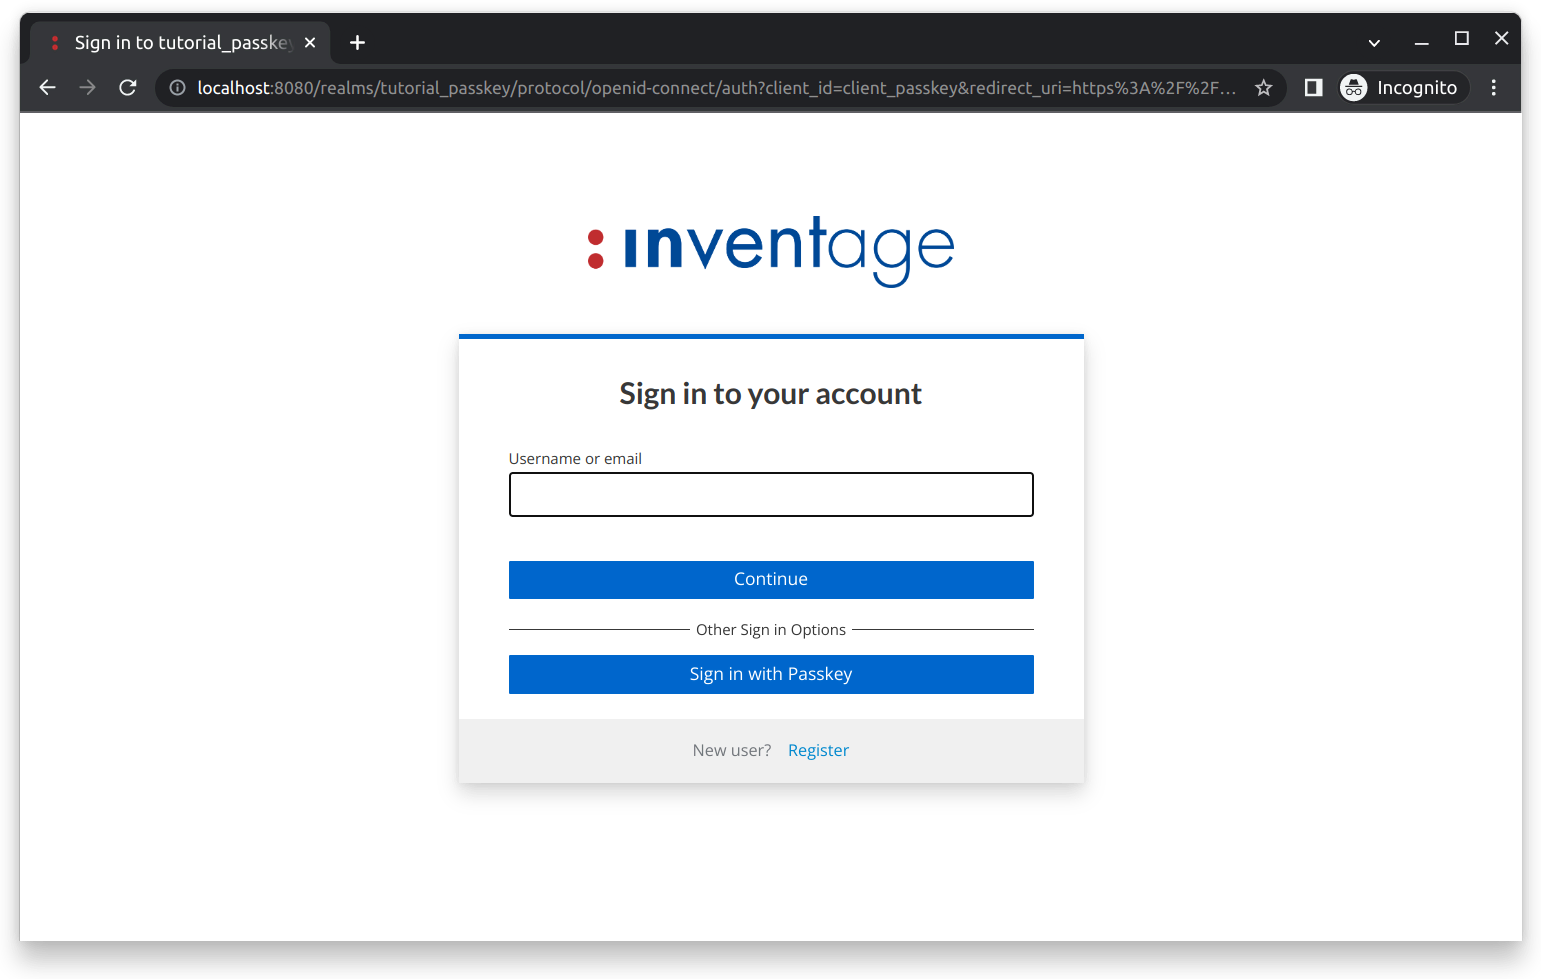
Registration
To register a new account, click on the blue Register link. You should see the registration form as shown below:
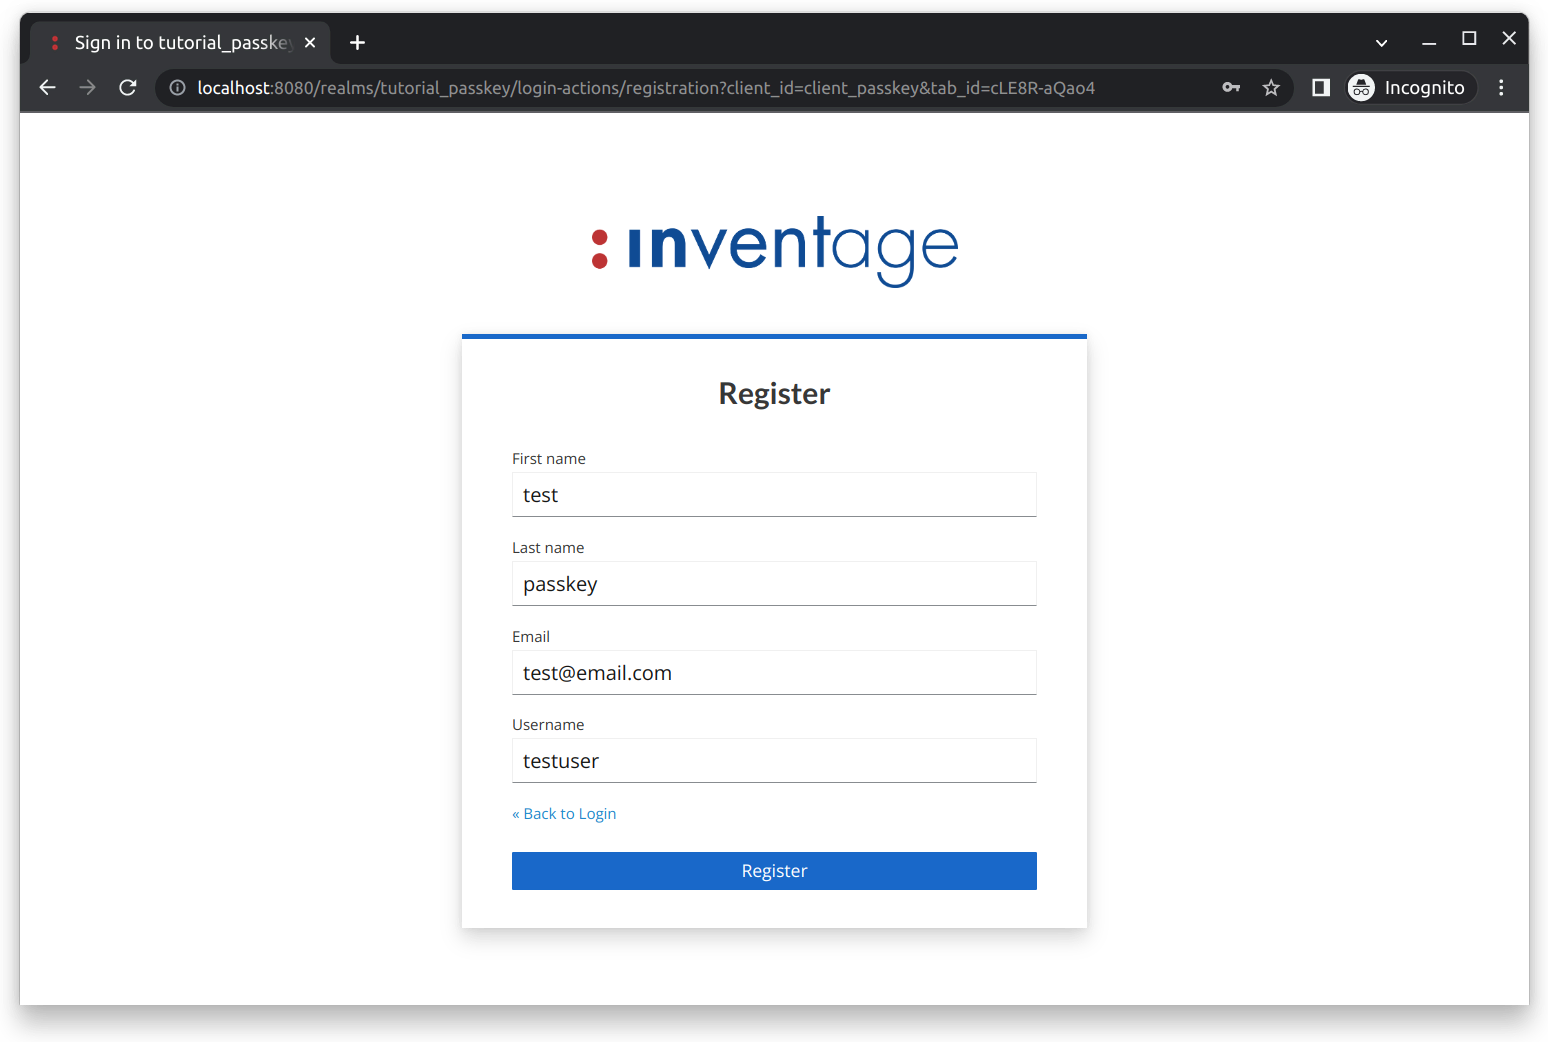
After filling out the form, continue the registration process by clicking on the Register button. You should see the credential selection page, as shown below:
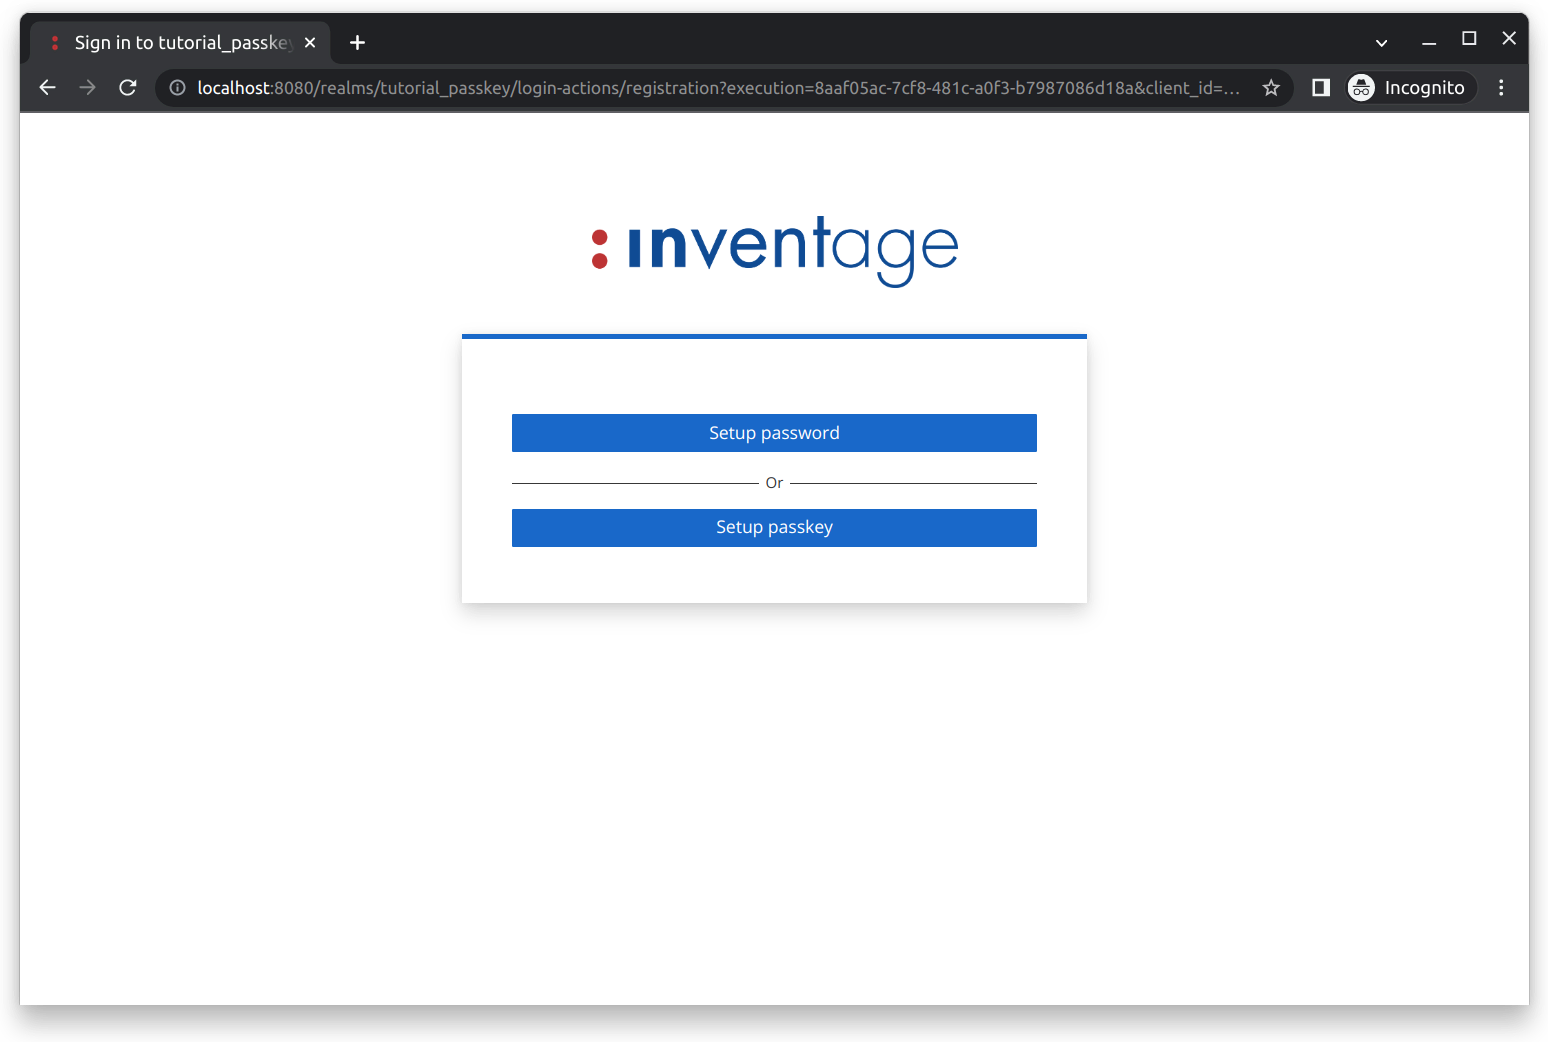
You can choose between 2 options for setting up your account:
Password: To set up a password for your newly created account, click the
Setup Passwordbutton. You will then be taken to another form where you can set your password.Passkey: To set up a passkey for your newly created account, click the
Setup passkeybutton. You will then be taken to the security key registration form, as shown below: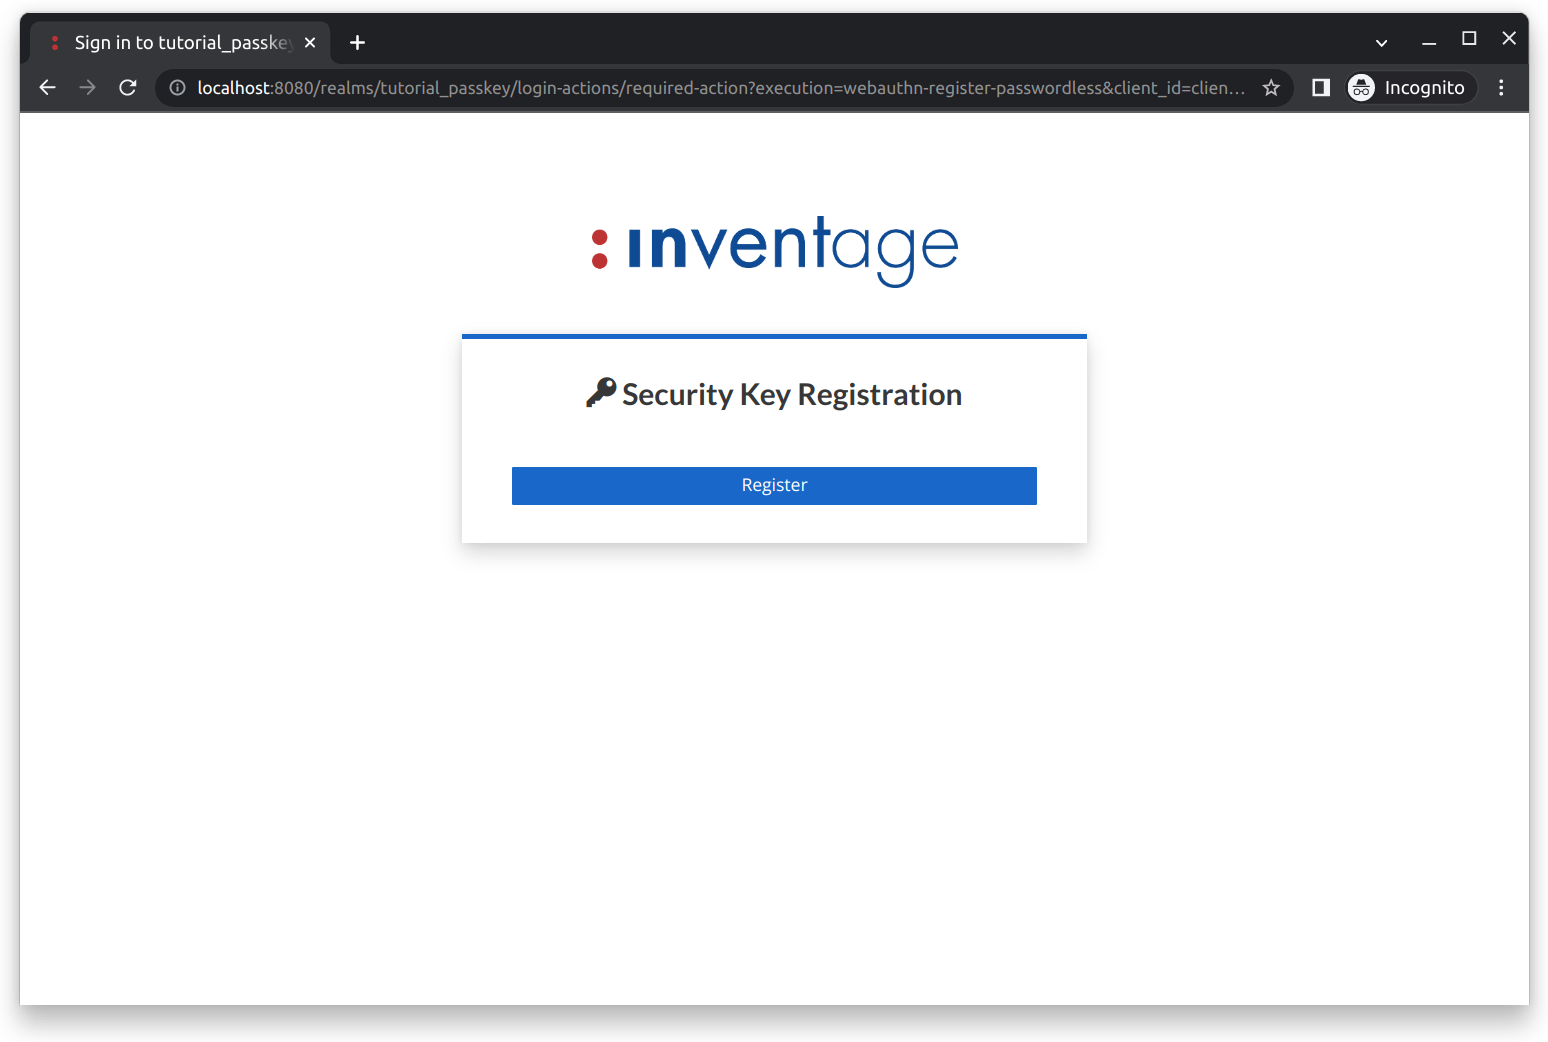 Click the
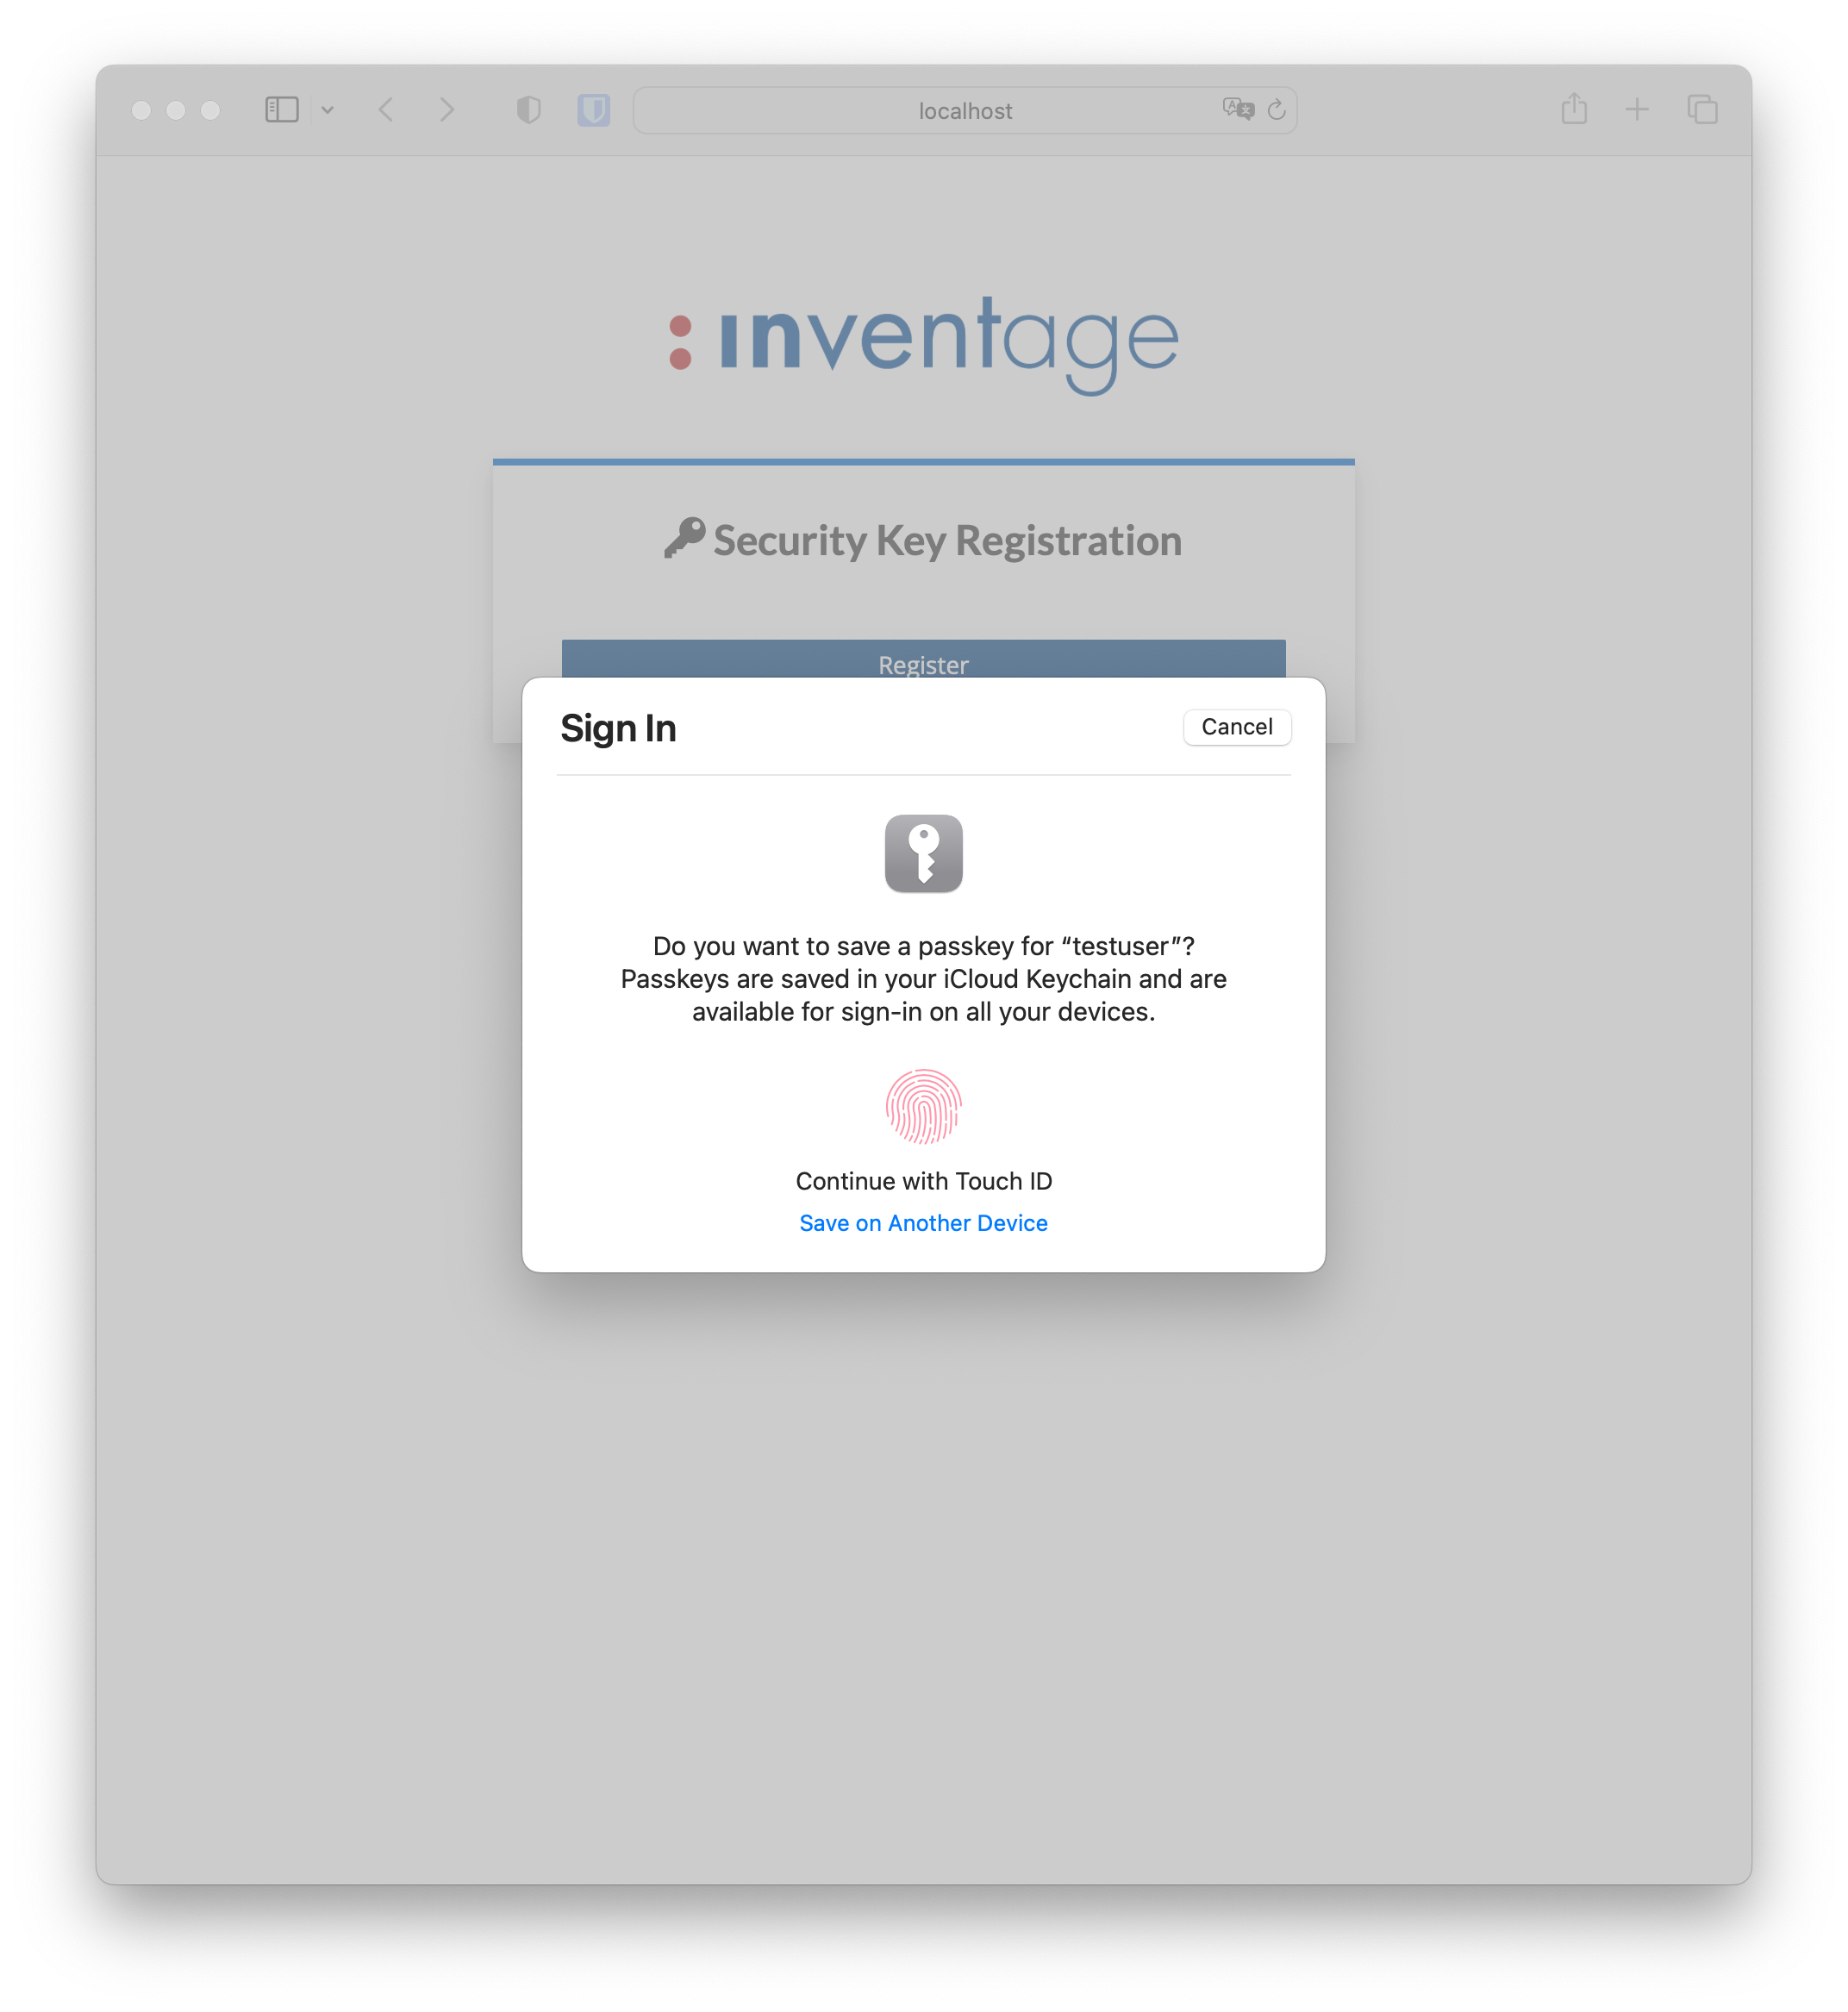
 Registerbutton. This will check if your current device’s operating system and browser support creating passkey credentials.If your current device supports passkey creation you will be prompted to create a passkey credential for this domain, as shown below:
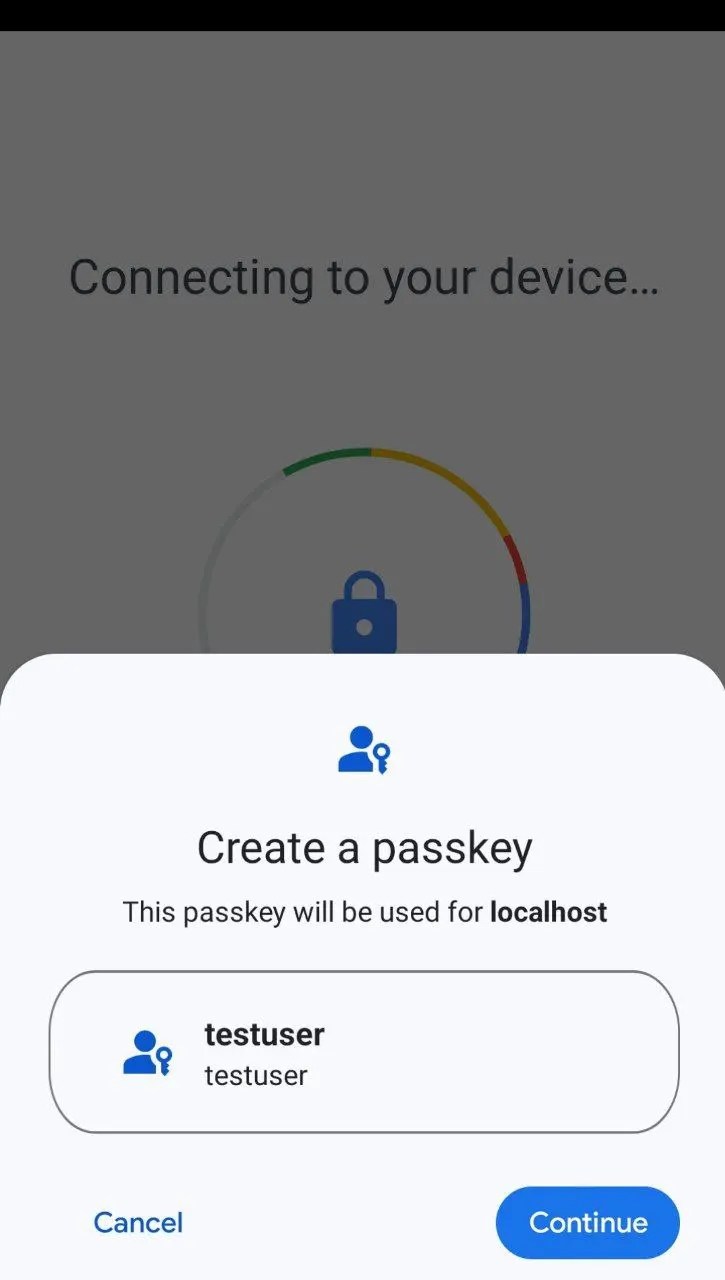
A prompt will appear if your current device does not support the creation of passkeys. You are asked to choose an external physical device with passkey support. Once you have successfully verified your identity with an authorization gesture (fingerprint, facial recognition, etc.), you are allowed to create a passkey credential for this domain, as shown below:
Authentication
You have 2 options for signing in:
Password: Enter your username and click the
Continuebutton and enter your password on the next form to sign in.Passkey: Click the
Sign in with passkeybutton. This checks whether any passkeys credentials are available on the current device.If passkeys are available, you will be prompted to pick one, as shown below:
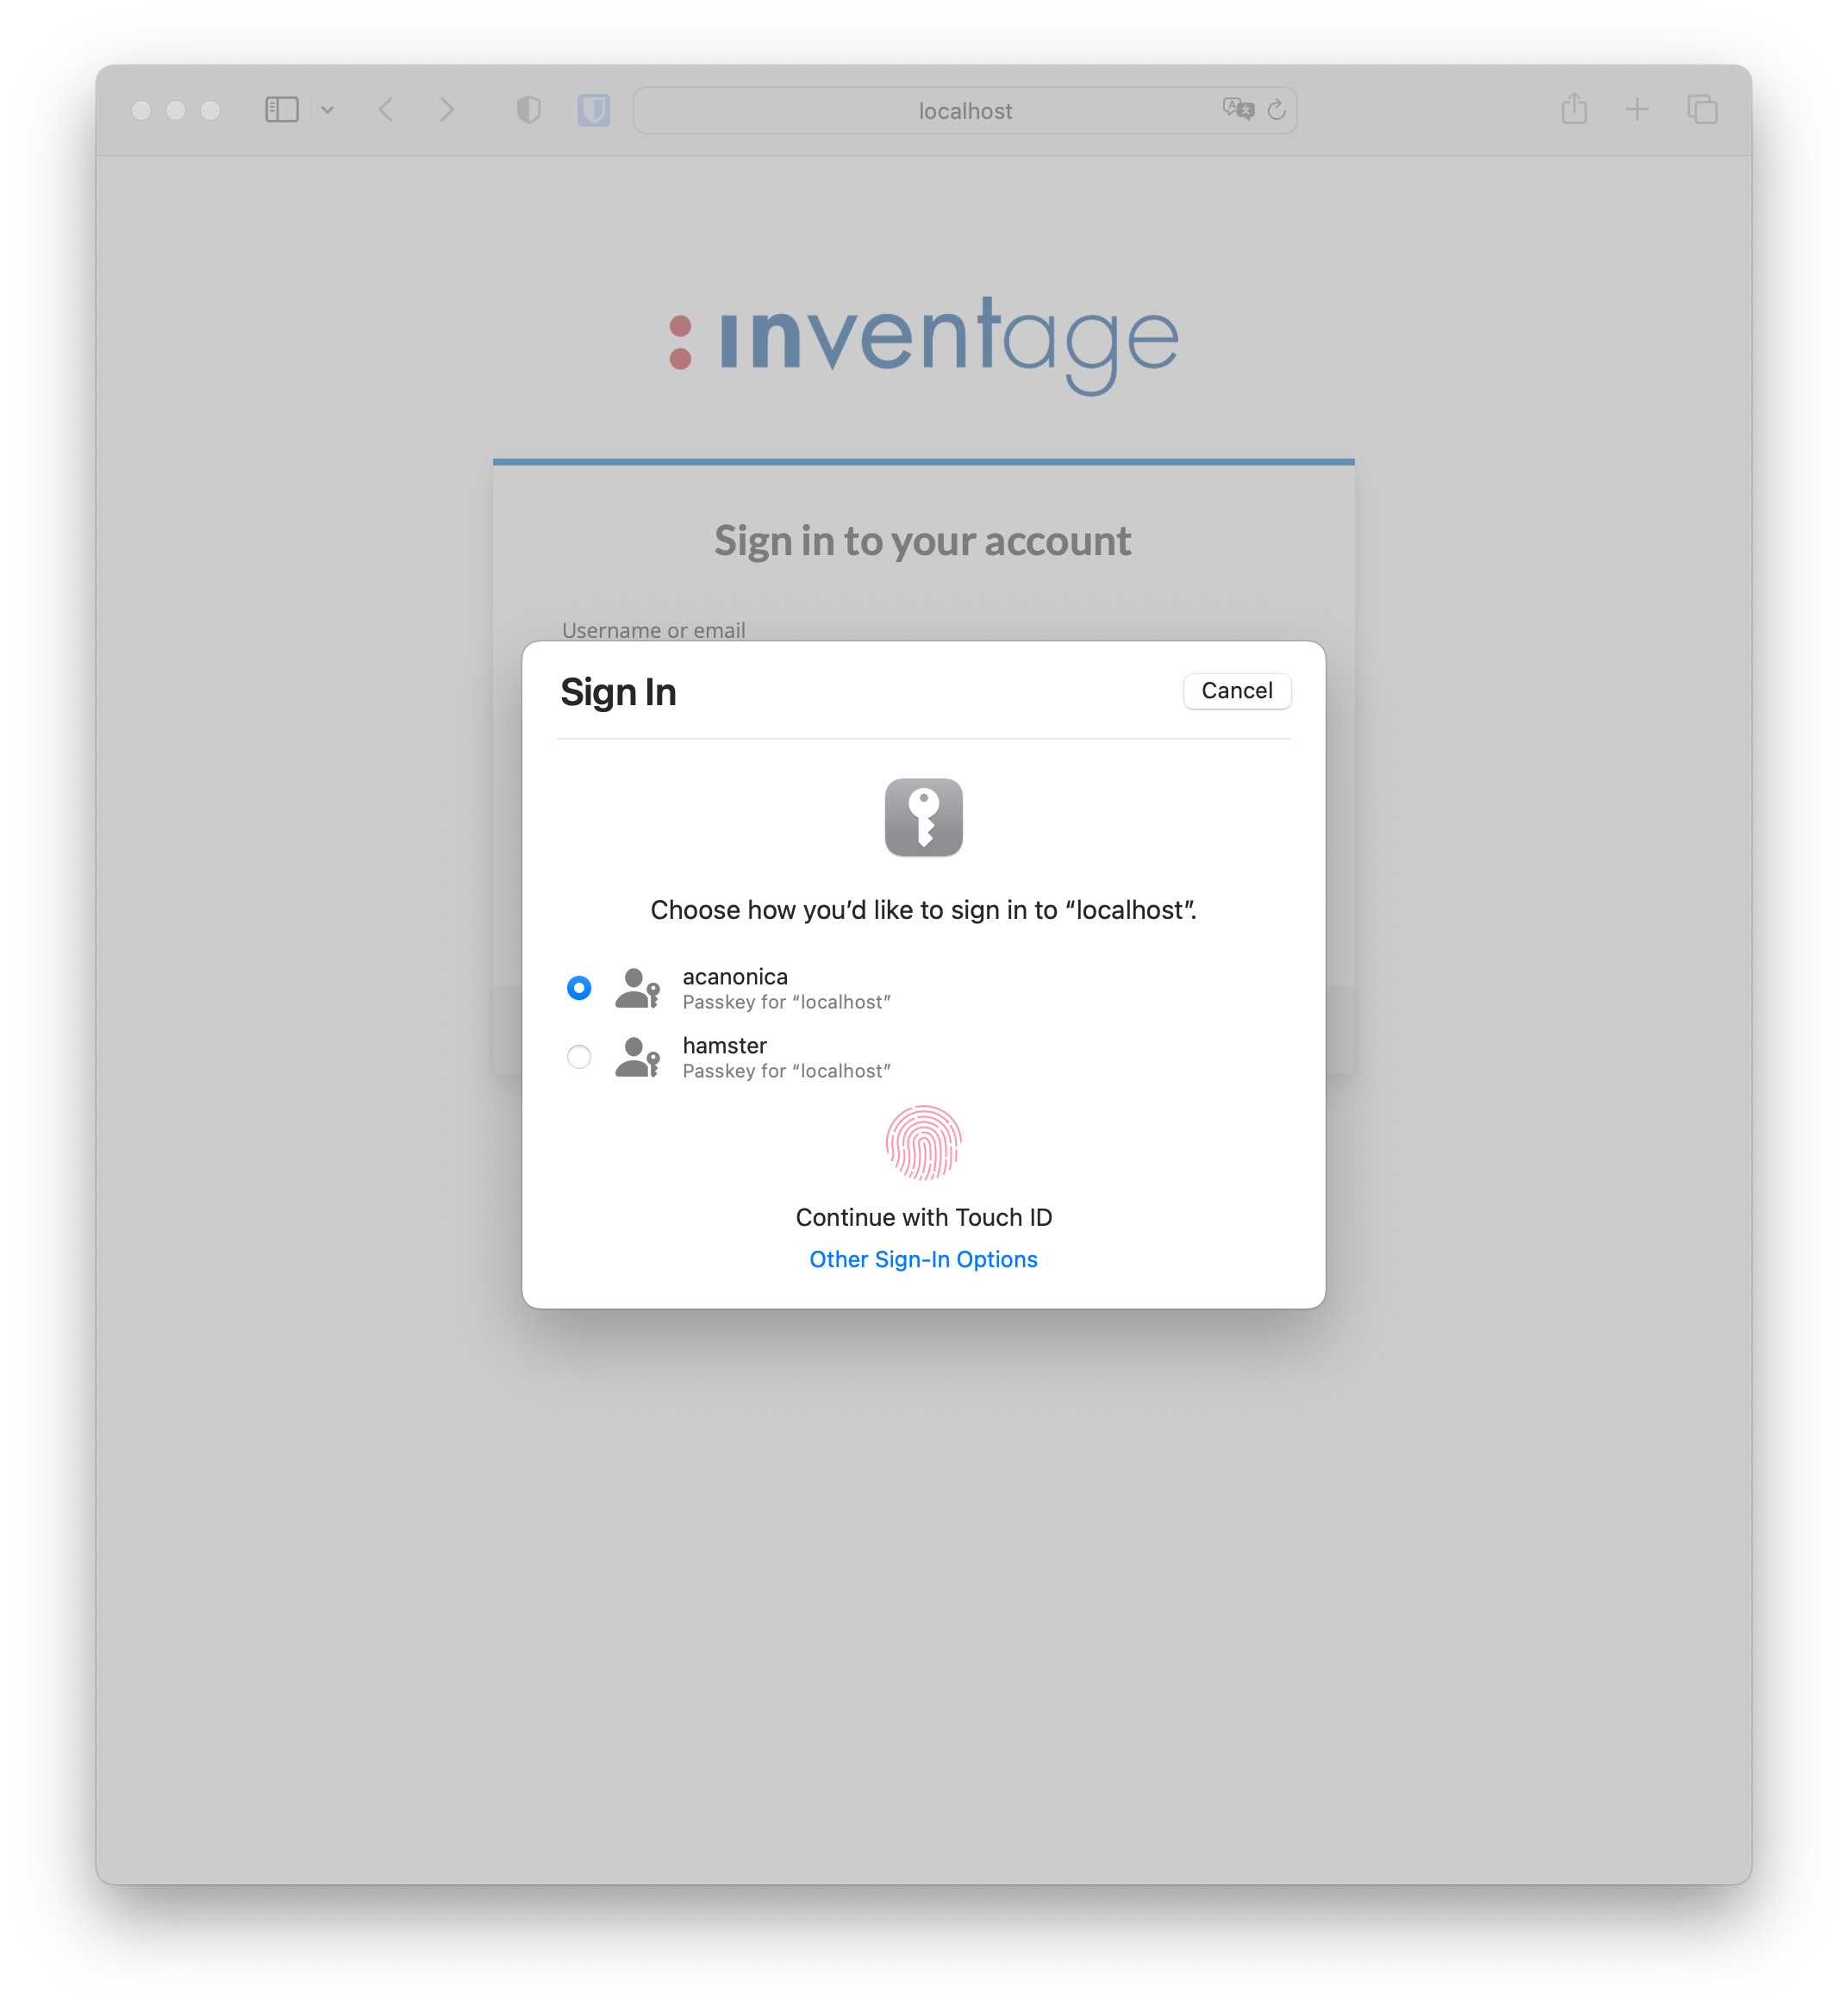
Once you have successfully verified your identity with an authorization gesture (fingerprint, facial recognition, etc.), the external device unlocks your passkey to sign in.
OS & Browser used in this example:
macOS Ventura 13.0.1andSafari 16.1.Cross-Device Authentication: A different prompt will appear if none are available, as shown below:
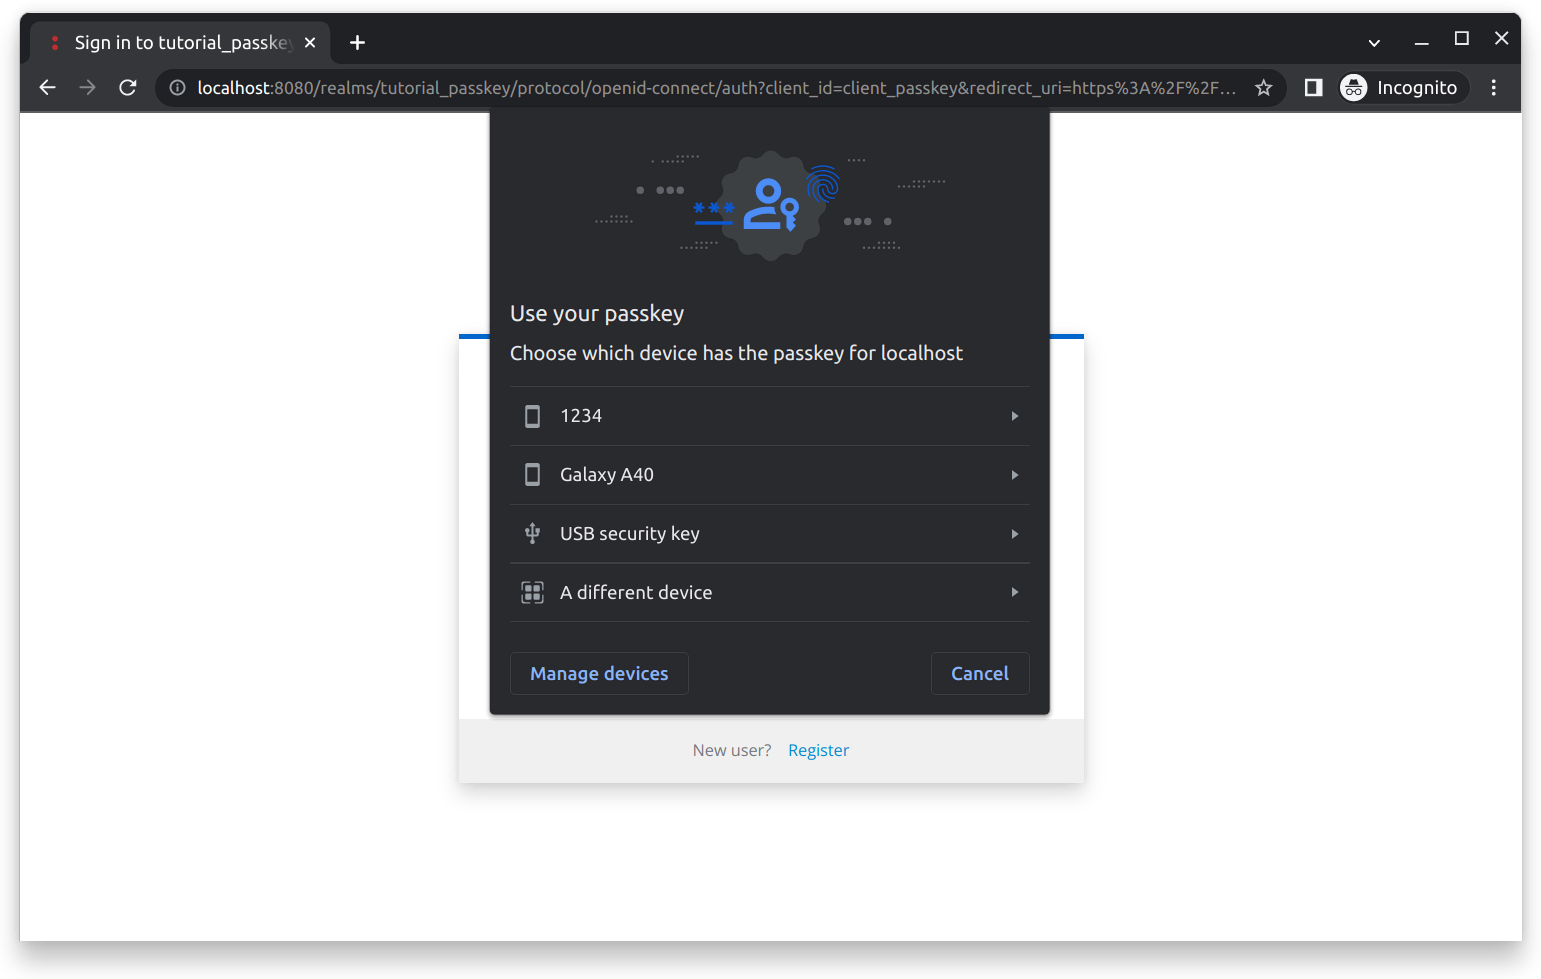
You will be prompted to select an external device (also called roaming authenticator) that has access to your passkey. Next, you need to select the desired passkey (it is possible to have multiple passkey credentials for one domain), as shown below:

Once you have successfully verified your identity with an authorization gesture (fingerprint, facial recognition, etc.), the external device unlocks your passkey to sign in. In this example, we used an Android device as roaming authenticator.
OS & Browser & external device used in this example:
Ubuntu 22.04.1 LTSandChrome 109.0.5414.74as cross-device client (CDA Client) ,Android 13.0as cross-device authenticator (CDA Authenticator).
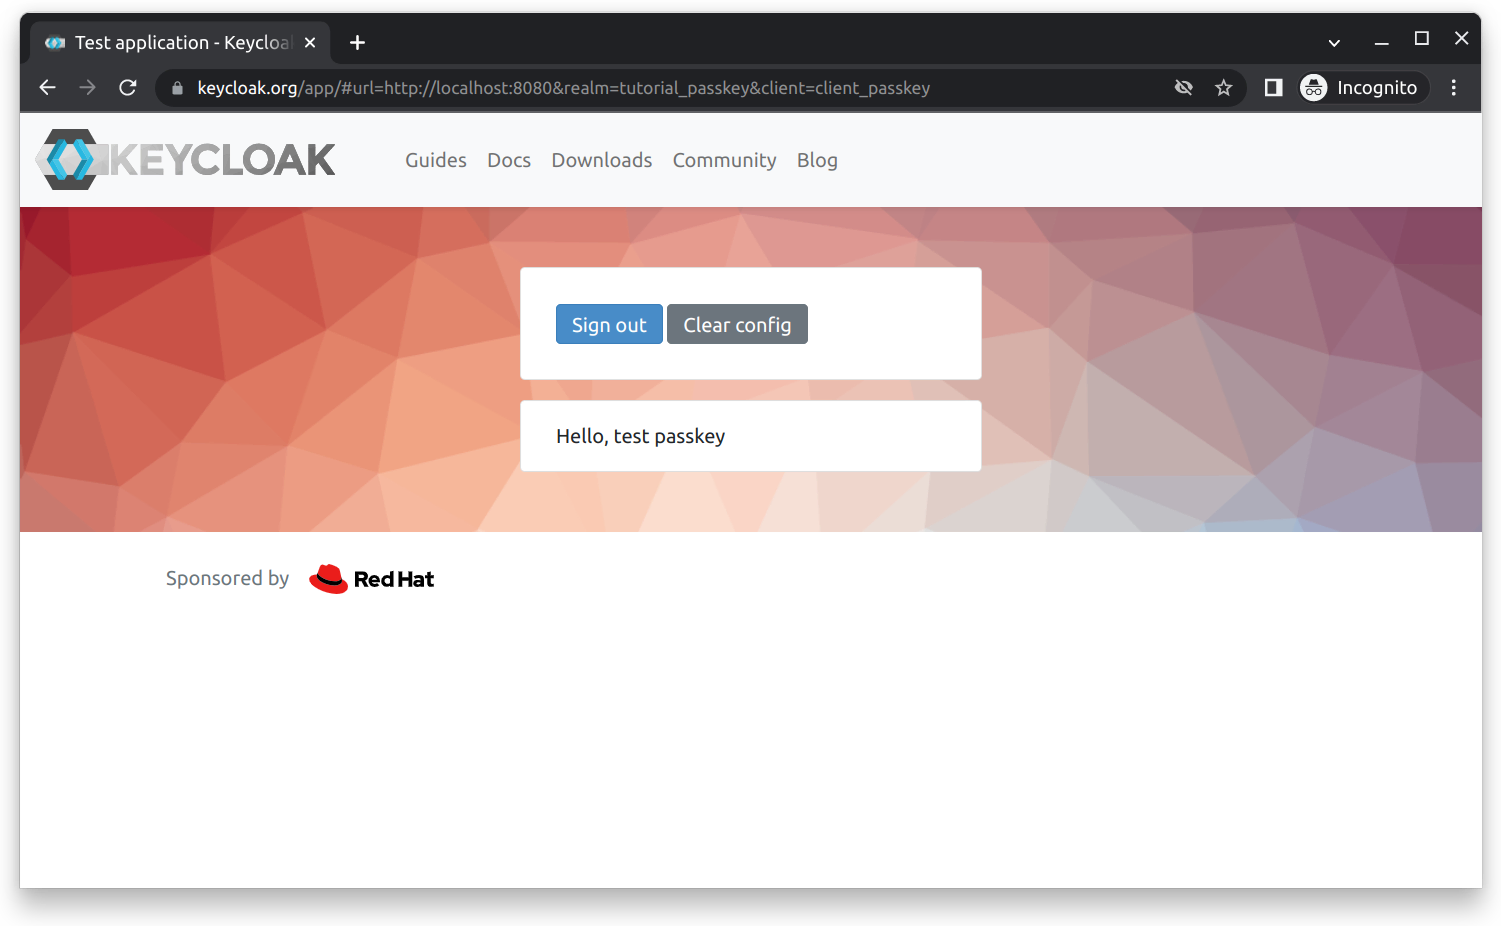
After a successful login, you should be redirected to the testing application on keycloak, as shown below:
Step 1: Overview
The passkey extension consists of 7 Java classes implementing Keycloak SPIs and 3 FTL templates. The extension provides customized registration and authentication actions that can be plugged into the registration and authentication flow. We structured the extension the same way as proposed in the extensions section of the Keycloak Custom Tutorial. The extension can be found as submodule named extension-passkey in the extensions module.
The Java classes can be found in src/main/java/com/inventage/keycloak and are grouped into subpackages according to their functionality:
registrationPasskeyOrPasswordRegistrationAuthenticator.javaPasskeyOrPasswordRegistrationAuthenticatorFactory.javaPasswordRegistrationAuthenticator.javaPasswordRegistrationAuthenticatorFactory.javaRegistrationUserCreationNoAccount.javaUtils.java
authenticationPasskeyLoginFormAuthenticator.javaPasskeyLoginFormAuthenticatorFactory.java
In the following sections Step 2 and Step 3, each component is explained in technical detail.
The FTL templates can be found in src/main/resources/theme-resources/templates:
passkey-or-password-registration.ftlpassword-registration.ftlpasskey-login-form.ftl
Please note: We are aware that passkey support on Keycloak can be enabled with minimal configuration that is not as extensive as ours. The aim of our passkey extension is to provide a more user-friendly passkey interface that also supports other sign-in options.
Keycloak configuration
In this subsection we provide an overview of all the configuration adjustments we have made in Keycloak. Please note that all of the configurations below are specified by the realm-passkey.json file and executed by the keycloak-config-cli tool.
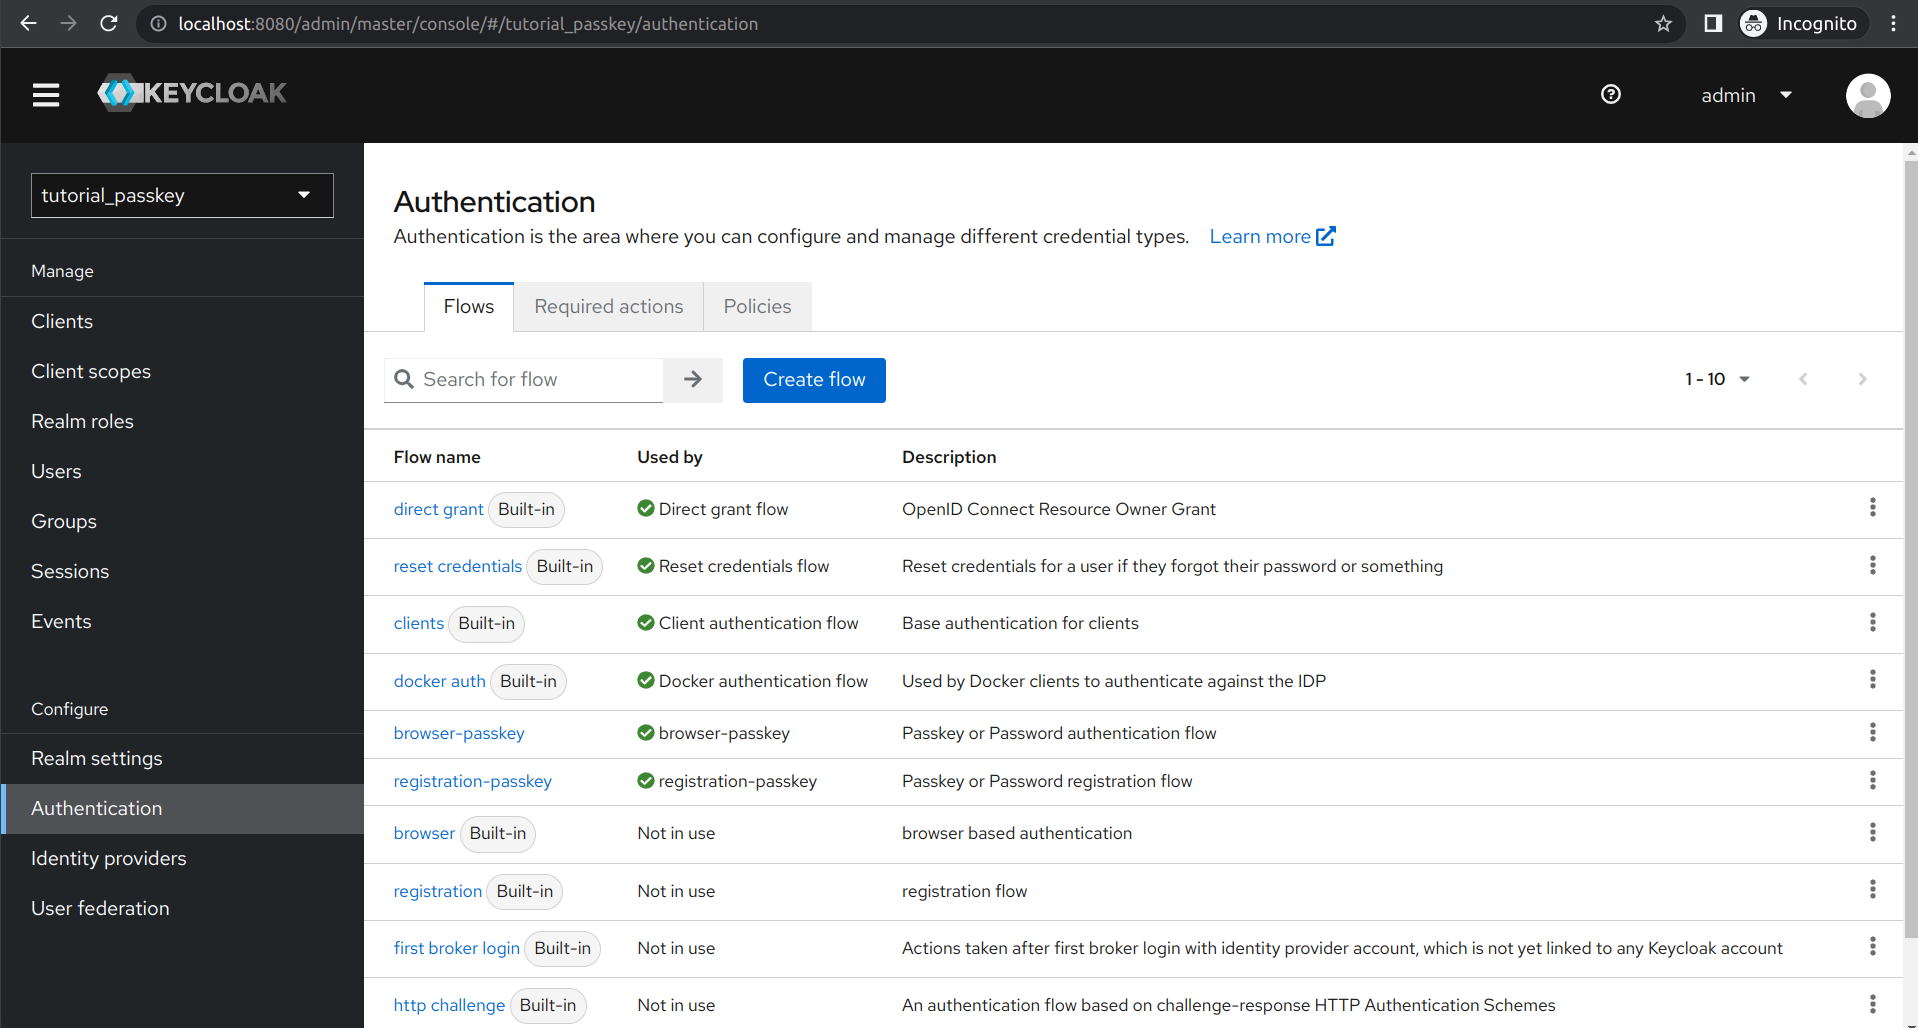
We created a new realm tutorial_passkey and within it a new client client_passkey. We have replaced both built-in flows with our custom registration-passkey and browser-passkey flows, as shown below:
Next, we had to enable Webauthn Register Passwordless in Keycloak under Required actions in the Authentication settings, as shown below:
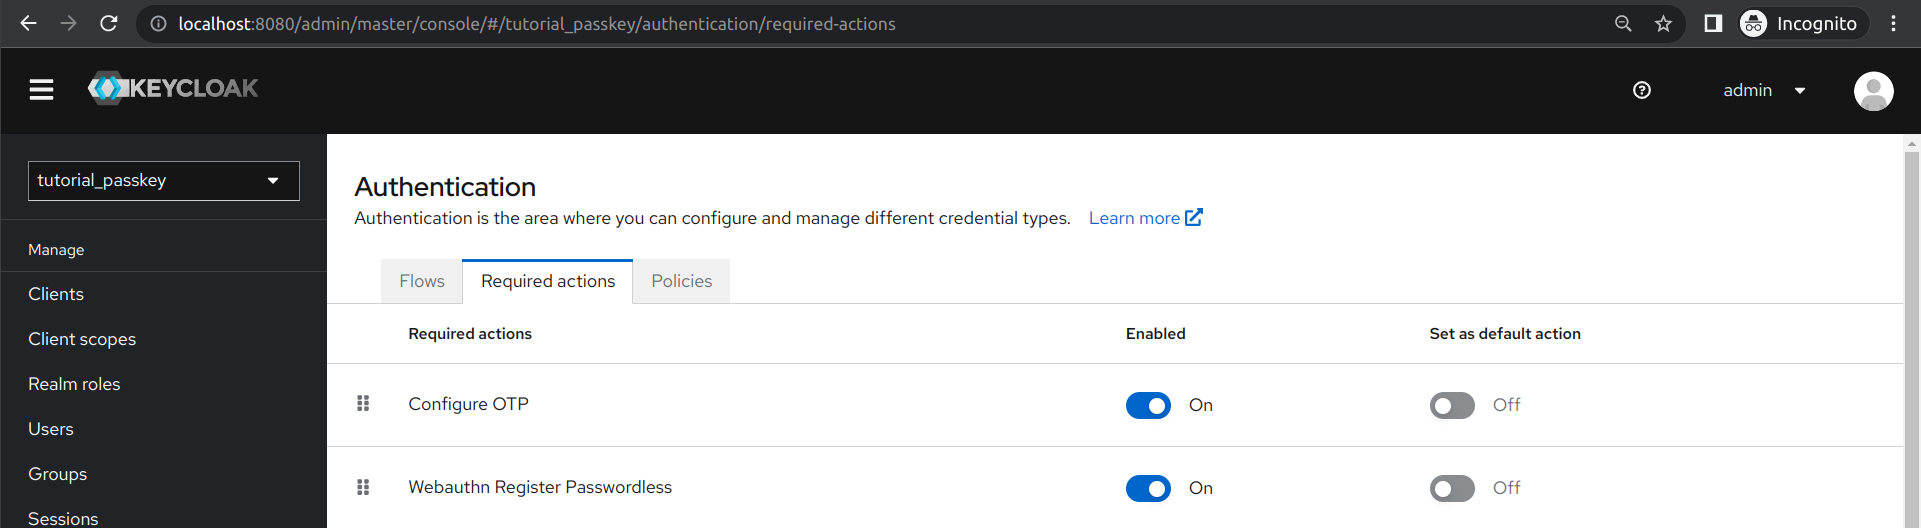
This allows users in this realm to register FIDO credentials (e.g. passkey) as their first authentication factor.
We also had to enable Require resident key in Keycloak under Ẁebauthn Passwordless Policy, Policies in the Authentication settings, as shown below:
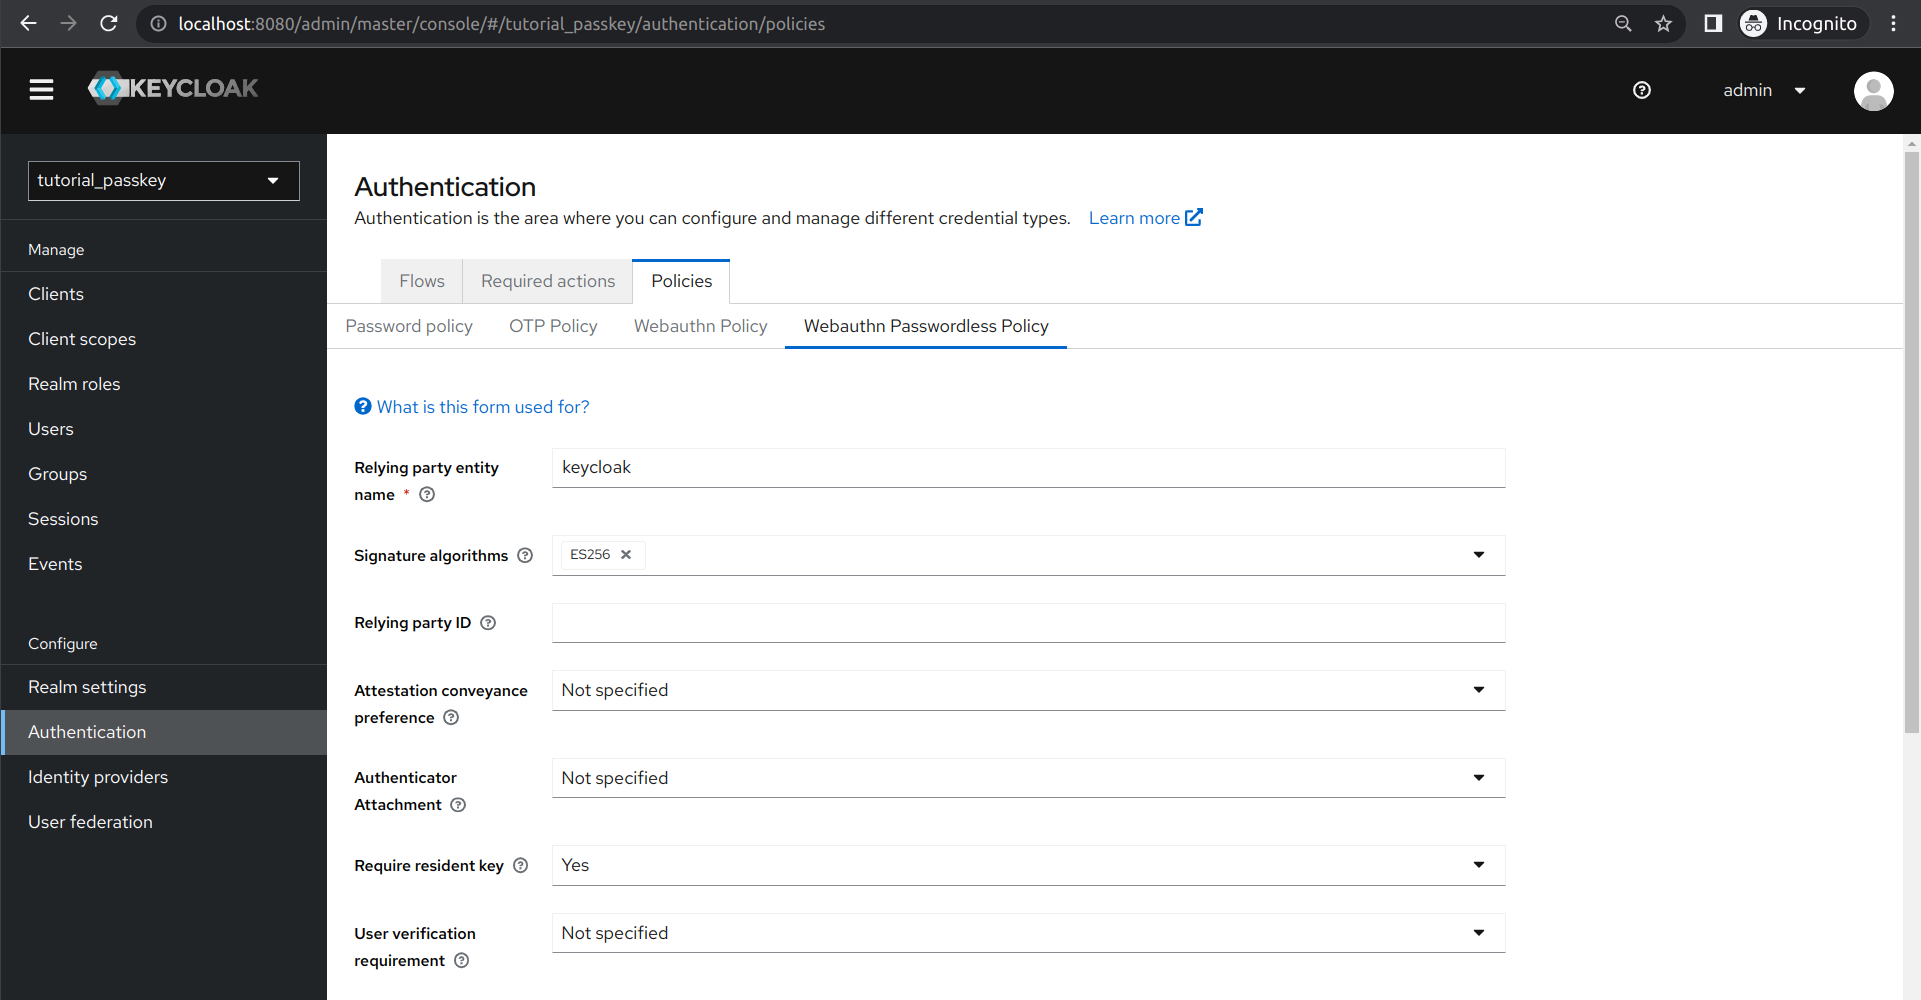
The term resident key is deprecated. The official term is Client-side discoverable credential. This allows Webauthn to initiate the authentication process without requiring the relying party (in our case, the Keycloak server) to first identify the user. This means that the user does not necessarily need to enter credential IDs (e.g. username) when signing in with passkeys.
Step 2: Registration
We replaced the built-in registration flow with our own registration-passkey as shown below:
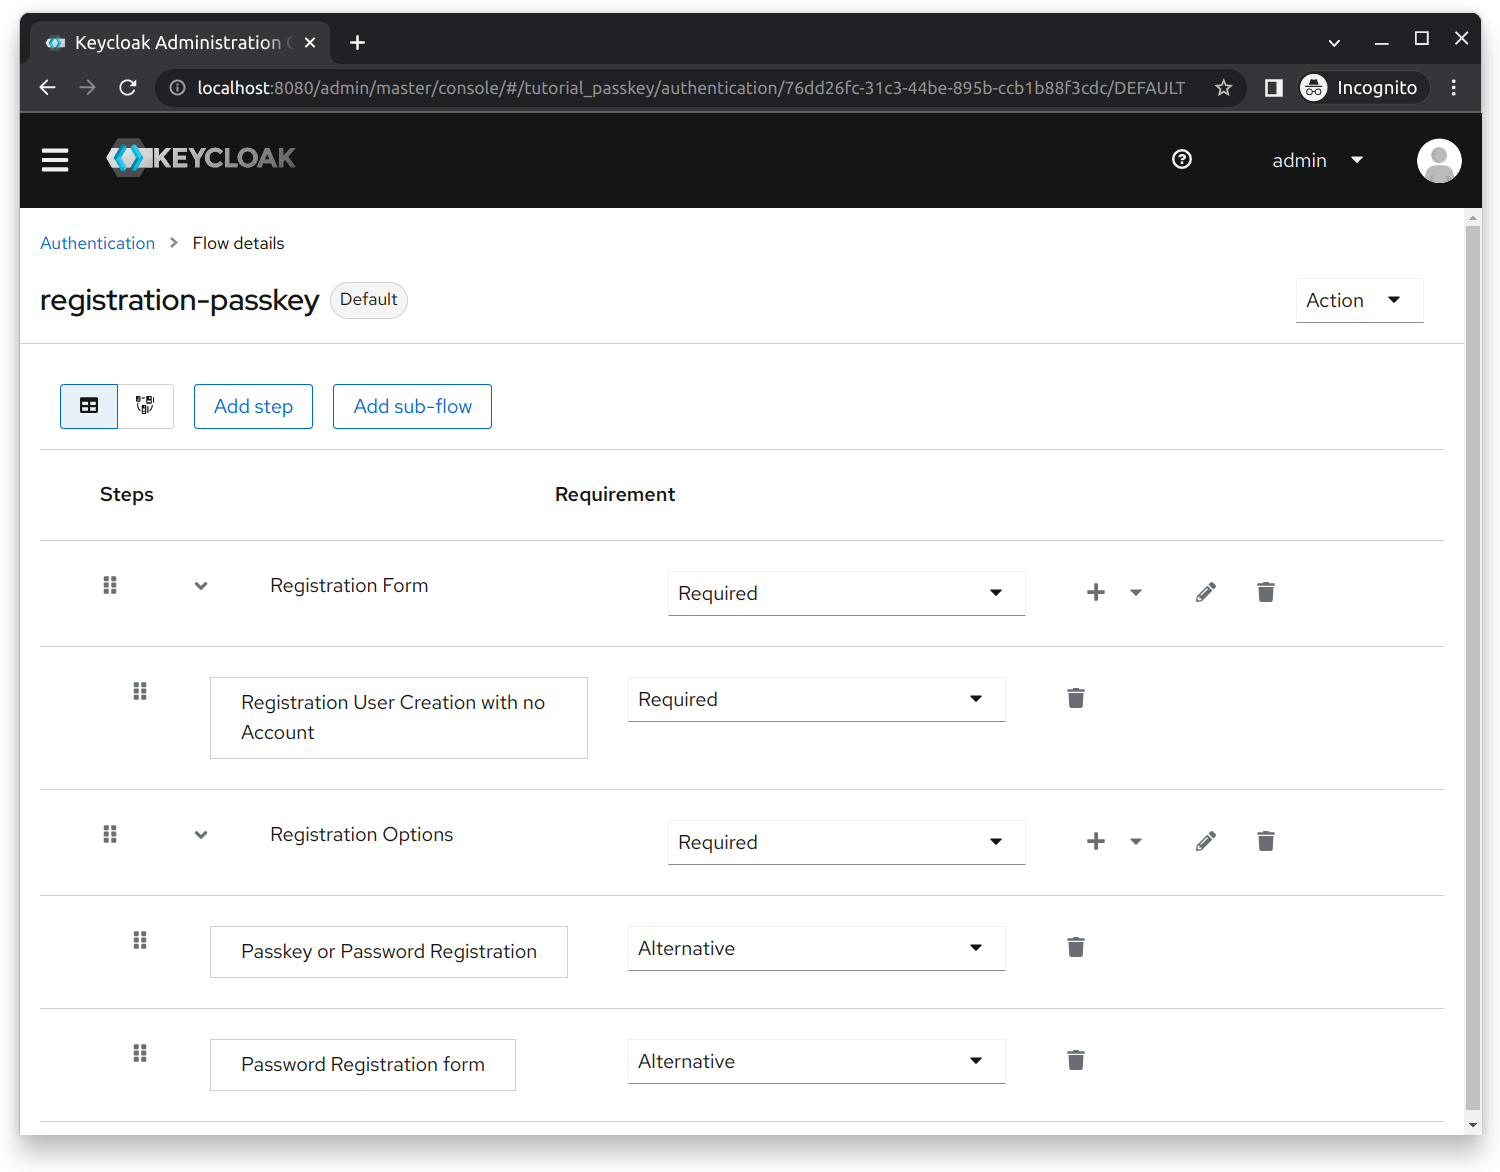
In this section, we explain each step’s implementation based on its order in the registration flow:
- Registration User Creation with no Account: This step is used in the subflow of a registration form. Instead of creating a user account immediately after the user submits their data, we store it to retrieve it at a later stage of the registration flow. The implementation and details of this step can be found in the Registration User Creation with no Account section.
- Passkey or Password Registration: Renders a custom page with two buttons labeled with
Setup with PasskeyorSetup with Password. Used to determine what type of credentials the user wants to set up for their account. The implementation and details of this step can be found in the Passkey or Password Registration section. - Password Registration Form: Renders a custom page with a password form for the user to set their password. Implemented similarly to the built-in
Password Validation, that implements the FormAction interface. With the difference that these classes implement the Authenticator SPI, which can also be used outside a registration form sub-flow.
Registration User Creation with no Account
Our implementation of the FormActionFactory interface is called RegistrationUserCreationNoAccount. We extend the built-in RegistrationUserCreation class (which already implements FormActionFactory) because we want to reuse its validation implementation, but not its success implementation because it creates a user account. As mentioned earlier, we want to delay the creation of the user account as much as possible.
As shown below, we do not entirely rely on the validation method of RegistrationUserCreation, since it does not validate the email address. Email validation is usually done in another FormAction called RegistrationProfile, which is also part of the built-in registration flow. We copied its email validation implementation and additionally call the validation method of RegistrationUserCreation to validate the remaining form data.
Once the submitted form data passes the validation checks, the success method is invoked. Instead of creating a user account, the submitted form data is saved and retrieved later in the registration process.
@AutoService(org.keycloak.authentication.FormActionFactory.class)
public class RegistrationUserCreationNoAccount extends RegistrationUserCreation {
  ...

  //Copied from org.keycloak.authentication.forms.RegistrationProfile as the validation check of RegistrationUserCreation does not check for invalid emails.
  @Override
  public void validate(ValidationContext context) {
    MultivaluedMap<String, String> formData = context.getHttpRequest().getDecodedFormParameters();

    context.getEvent().detail(Details.REGISTER_METHOD, "form");

    UserProfileProvider profileProvider = context.getSession().getProvider(UserProfileProvider.class);
    UserProfile profile = profileProvider.create(UserProfileContext.REGISTRATION_PROFILE, formData);

    //We check if the email address is already in use. If yes, we return an error that is displayed to the user.
    try {
      profile.validate();
    } catch (ValidationException pve) {
      List<FormMessage> errors = Validation.getFormErrorsFromValidation(pve.getErrors());

      if (pve.hasError(Messages.EMAIL_EXISTS, Messages.INVALID_EMAIL)) {
        context.getEvent().detail(Details.EMAIL, profile.getAttributes().getFirstValue(UserModel.EMAIL));
      }

      if (pve.hasError(Messages.EMAIL_EXISTS)) {
        context.error(Errors.EMAIL_IN_USE);
      } else
        context.error(Errors.INVALID_REGISTRATION);

      context.validationError(formData, errors);
      return;
    }

    super.validate(context);
  }

  @Override
  public void success(FormContext context) {
    //Following successful filling of the form, we store the required user information in the authentication session notes. This stored information is then retrieved at a later time to create the user account.
    Utils.storeUserDataInAuthSessionNotes(context);
  }

  ...
}
Passkey or Password Registration
This step implements the Authenticator SPI and consists of its factory, authenticator and its custom ftl file that renders the selection page.
Factory: PasskeyOrPasswordRegistrationAuthenticatorFactory
Our implementation of the AuthenticatorFactory interface is called PasskeyOrPasswordRegistrationAuthenticatorFactory. The implementation contains mainly the ID of this provider. It also contains the possible requirement options within the registration flow. The following snippet shows an excerpt of the implementation:
public class PasskeyOrPasswordRegistrationAuthenticatorFactory implements AuthenticatorFactory {

  public static final String PROVIDER_ID = "passkey-password-selection";
  private static final AuthenticationExecutionModel.Requirement[] REQUIREMENT_CHOICES = {
          AuthenticationExecutionModel.Requirement.REQUIRED,
          AuthenticationExecutionModel.Requirement.ALTERNATIVE,
          AuthenticationExecutionModel.Requirement.DISABLED
  };

  private static final PasskeyOrPasswordRegistrationAuthenticator SINGLETON = new PasskeyOrPasswordRegistrationAuthenticator();

  @Override
  public Authenticator create(KeycloakSession session) {
    return SINGLETON;
  }

  @Override
  public AuthenticationExecutionModel.Requirement[] getRequirementChoices() {
    return REQUIREMENT_CHOICES;
  }

  @Override
  public String getId() {
    return PROVIDER_ID;
  }
  ...
}
Authenticator: PasskeyOrPasswordRegistrationAuthenticator
Our implementation of the Authenticator interface is called PasskeyOrPasswordRegistrationAuthenticator. Once this step is reached in the registration flow, the authenticate method is called, that will display passkey-or-password-selection.ftl to the user.
Once the user has submitted their choice, the action method is invoked. If the user decides to set up a passkey, we need to create their account. The existence of their user account is required in the built-in WebAuthnPasswordlessRegister. WebAuthnPasswordlessRegister needs to be dynamically added to the registration flow, otherwise this action (if enabled as a required action by default) will also appear at the end when setting up a password.
When the user decides to set up a password, context.attempted() is called, which takes us to the password registration form that is configured as an alternative step.
When the user decides to set up a passkey, context.success() is called, the registration flow is completed and shows as the last step the dynamically added built-in required action WebAuthnPasswordlessRegister that allows the user to register their passkey.
public class PasskeyOrPasswordRegistrationAuthenticator implements Authenticator {

  public static final String SETUP_TYPE = "setupType";
  public static final String SETUP_PASSKEY = "passkey";
  private static final String TPL_CODE = "passkey-or-password-registration.ftl";

  @Override
  public void authenticate(AuthenticationFlowContext context) {
    LoginFormsProvider form = context.form();
    // Render passkey-or-password-selection.ftl form to user
    context.challenge(form.createForm(TPL_CODE));
  }

  @Override
  public void action(AuthenticationFlowContext context) {
    MultivaluedMap<String, String> params = context.getHttpRequest().getDecodedFormParameters();

    //The setup type (whether the user wants to set up a passkey or a password) is passed via form parameter
    String setupType = params.getFirst(SETUP_TYPE);

    AuthenticationSessionModel authenticationSession = context.getAuthenticationSession();

    if (setupType.equals(SETUP_PASSKEY)) {
      //We create an user from the session notes. The existence of this user is required in WebAuthnPasswordlessRegister.
      Utils.createUserFromAuthSessionNotes(context);
      if (!authenticationSession.getRequiredActions().contains(WebAuthnPasswordlessRegisterFactory.PROVIDER_ID)) {
        //We add the WebAuthnPasswordlessRegister as required action (for registering passkeys) if not already configured in keycloak.
        authenticationSession.addRequiredAction(WebAuthnPasswordlessRegisterFactory.PROVIDER_ID);
      }
      context.success();
    } else {
      // If the user chooses another setup type (password). We continue with the alternative configured in the registration flow.
      context.attempted();
    }
  }
  ...
}
Template: passkey-or-password-registration.ftl
Once the step in the registration flow is reached, this page is displayed to the user. The form action defined at the beginning of the file passes the setupType to the action url. With javascript it is first checked if WebAuthn is supported by the current browser. If WebAuthn is not supported, passkey is not supported, so it goes directly to the password registration step by passing password as setupType. Otherwise, setupType is defined by the button pressed by the user. If the Setup Password button is pressed, the setupPassword() function is called, passing password as setupType. The same applies to the Setup Passkey button.
<#import "template.ftl" as layout>
<@layout.registrationLayout; section>
    <#if section = "header">
    <#elseif section = "form">
        <form id="setupAuth" action="${url.loginAction}" method="post">
            <input type="hidden" id="setupType" name="setupType"/>
        </form>
        <div id="kc-form-buttons" class="${properties.kcFormGroupClass!}">
            <input tabindex="4"
                   class="${properties.kcButtonClass!} ${properties.kcButtonPrimaryClass!} ${properties.kcButtonBlockClass!} ${properties.kcButtonLargeClass!}"
                   name="login" id="kc-login" type="submit" value="Setup password" onclick="setupPassword()"/>
        </div>

        <div style="border-bottom: 1px solid;  text-align: center;  height: 10px;  margin-bottom: 10px;">
            <span style="background: #fff; padding: 0 5px;">Or</span>
        </div>

        <div id="kc-form-buttons" class="${properties.kcFormGroupClass!}">
            <input tabindex="4"
                   class="${properties.kcButtonClass!} ${properties.kcButtonPrimaryClass!} ${properties.kcButtonBlockClass!} ${properties.kcButtonLargeClass!}"
                   name="login" id="kc-login" type="submit" value="Setup passkey" onclick="setupPasskey()"/>
        </div>
    </#if>
    <script type="text/javascript" src="${url.resourcesCommonPath}/node_modules/jquery/dist/jquery.min.js"></script>
    <script type="text/javascript">
        // Check if WebAuthn is supported by this browser
        // If not redirect to password setup
        if (!window.PublicKeyCredential) {
            $("#setupType").val("password");
            $("#setupAuth").submit();
        }
        if (document.getElementById("kc-select-try-another-way-form") != null) {
            document.getElementById("kc-select-try-another-way-form").style.display = "none";
        }
        function setupPasskey() {
            $("#setupType").val("passkey");
            $("#setupAuth").submit();
        }
        function setupPassword() {
            $("#setupType").val("password");
            $("#setupAuth").submit();
        }
    </script>

</@layout.registrationLayout>
Step 3: Authentication
We replaced the built-in browser flow with our own browser-passkey as shown below:
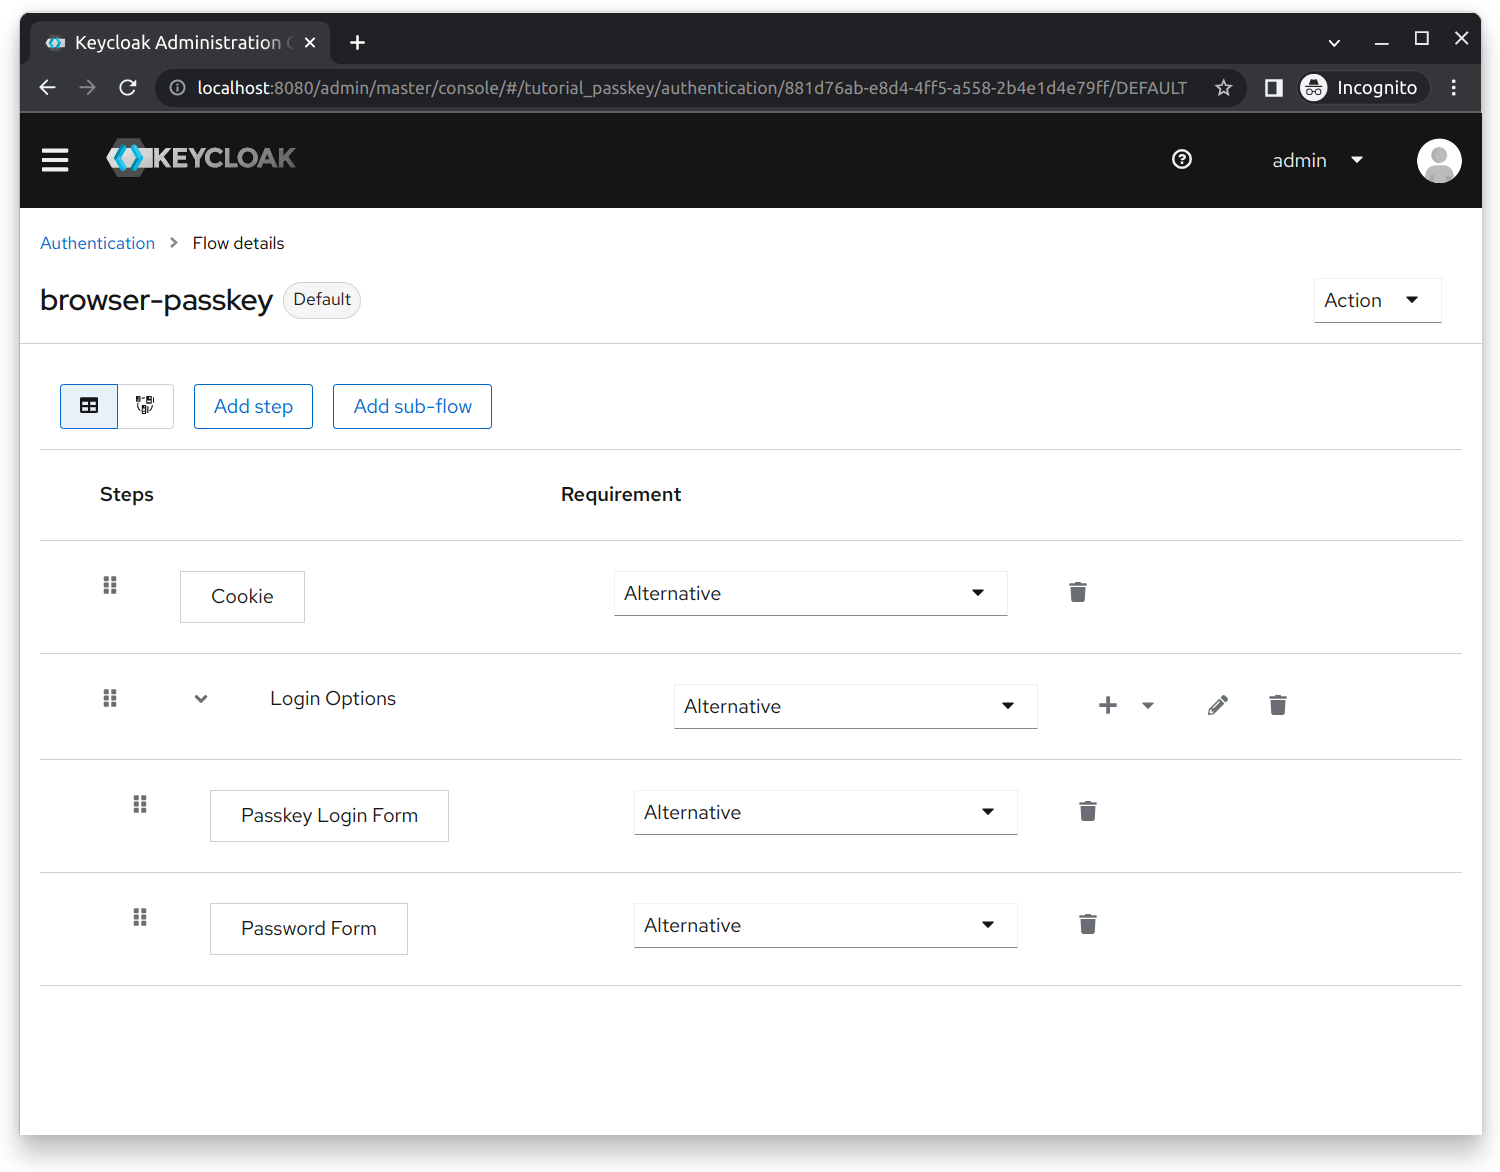
In this section, we explain each step’s implementation based on its order in the authentication flow:
- Passkey Login Form: Renders the custom login page. Offers the options to either sign in with passkey or with password. The implementation and details of this step can be found in the Passkey Login Form section.
Passkey Login Form
This step implements the Authenticator SPI and consists of its factory, authenticator and its custom ftl file that renders the login page.
Factory: PasskeyLoginFormAuthenticatorFactory
Our implementation of the AuthenticatorFactory interface is called PasskeyLoginFormAuthenticatorFactory that inherits from the WebAuthnPasswordlessAuthenticatorFactory. Unless we inherit from this class, the user profile settings will not display the registered passkey credentials. Keycloak only displays credential types they can detect in our flows. This makes Keycloak aware that our flow also supports FIDO credentials (e.g. passkey) and thus displays the registered passkeys. The implementation contains as usual the ID of this provider. It also contains the possible requirement options within the authentication flow. The following snippet shows an excerpt of the implementation:
public class PasskeyLoginFormAuthenticatorFactory extends WebAuthnPasswordlessAuthenticatorFactory {

  public static final String PROVIDER_ID = "passkey-login-form";
  private static final AuthenticationExecutionModel.Requirement[] REQUIREMENT_CHOICES = {
          AuthenticationExecutionModel.Requirement.REQUIRED,
          AuthenticationExecutionModel.Requirement.ALTERNATIVE
  };

  @Override
  public Authenticator create(KeycloakSession session) {
    return new PasskeyLoginFormAuthenticator(session);
  }

  @Override
  public String getId() {
    return PROVIDER_ID;
  }

  @Override
  public AuthenticationExecutionModel.Requirement[] getRequirementChoices() {
    return REQUIREMENT_CHOICES;
  }
  ...
}
Authenticator: PasskeyLoginFormAuthenticator
Our implementation of the Authenticator interface is called PasskeyLoginFormAuthenticator, that inherits from the built-in WebAuthnPasswordlessAuthenticator. Once this step is reached in the authentication flow, the authenticate method is called, which will render our login page passkey-login.ftl to the user. As mentioned earlier, the user can either sign in with passkey or with username & password. To enable passkey login, Keycloak (as the WebAuthn Relying Party) needs to bootstrap the WebAuthn authentication ceremony by generating a challenge that the user needs to cryptographically sign to prove their identity. The challenge value and other necessary parameters for the authentication ceremony will be passed on to passkey-login.ftl. This happens in the createLoginFormWithWebauthnChallenge method, that is for the most part identical to the built-in WebAuthnAuthenticator authenticate method. The reason we can’t simply reuse its code is because we want to render our own ftl file. But by inheriting from WebAuthnPasswordlessAuthenticator that inherits from WebAuthnAuthenticator we can reuse some useful methods.
Once the user data has been submitted, the action method is called. First of all, it is determined with the method isPasskeyLogin whether the user has attempted to sign in with their passkey or with their username.
If the user attempted to sign in with passkey:
- Check if WebAuthn failed (with the method
hasWebAuthnFailed). If it failed, we display an error to the user (with the methodhandleWebauthnError). Possible fails: The user has failed to unlock their passkeys or the user has in any way interrupted the WebAuthn ceremony, etc. - If Webauthn did not fail, we check the Authentication Assertions validity (contains the signed challenge value), which is transmitted via the form data parameters. This validation check is done by the
verifyWebauthnChallengeResponsemethod. If the validation succeeds, the user is signed in. Otherwise, we display an error.
If the user wants to sign in with their username:
- We check if the username is associated with an existing user account in this realm (with the method
retrieveUser). If not we display an error to the user (with the methodhandleInvalidUsernameError). - We check if the user has set up a password for their user account. If not we display an error to the user. Otherwise, we first need to set the user in the current context. This is required in the built-in
PasswordForm, that comes as next step in the authentication flow.
The implementation and explanation of each method mentioned can be found below this code excerpt:
public class PasskeyLoginFormAuthenticator extends WebAuthnPasswordlessAuthenticator {

  private static final String TPL_CODE = "passkey-login.ftl";
  private static final String USERNAME_KEY = "username";
  private KeycloakSession session;

  public PasskeyLoginFormAuthenticator(KeycloakSession session) {
    super(session);
    this.session = session;
  }

  // renders initial login page.
  @Override
  public void authenticate(AuthenticationFlowContext context) {
    // The authenticate method is identical with the built-in method of org.keycloak.authentication.authenticators.browser.WebAuthnAuthenticator
    // except that we use our own ftl-template "passkey-login.ftl", that renders our custom login page.
    LoginFormsProvider form = createLoginFormWithWebauthnChallenge(context);
    if (form != null) {
      context.challenge(form.createForm(TPL_CODE));
    }
  }

  /**
   * Copied from org.keycloak.authentication.authenticators.browser.WebAuthnAuthenticator#authenticate
   * Encodes the Webauthn challenge in the ftl template, that will be displayed to the user.
   **/
  private LoginFormsProvider createLoginFormWithWebauthnChallenge(AuthenticationFlowContext context) {
    LoginFormsProvider form = context.form();

    Challenge challenge = new DefaultChallenge();
    String challengeValue = Base64Url.encode(challenge.getValue());
    context.getAuthenticationSession().setAuthNote(WebAuthnConstants.AUTH_CHALLENGE_NOTE, challengeValue);
    form.setAttribute(WebAuthnConstants.CHALLENGE, challengeValue);

    WebAuthnPolicy policy = getWebAuthnPolicy(context);
    String rpId = getRpID(context);
    form.setAttribute(WebAuthnConstants.RP_ID, rpId);
    form.setAttribute(WebAuthnConstants.CREATE_TIMEOUT, policy.getCreateTimeout());

    UserModel user = context.getUser();
    boolean isUserIdentified = false;
    if (user != null) {
      // in 2 Factor Scenario where the user has already been identified
      WebAuthnAuthenticatorsBean authenticators = new WebAuthnAuthenticatorsBean(context.getSession(), context.getRealm(), user, getCredentialType());
      if (authenticators.getAuthenticators().isEmpty()) {
        // require the user to register webauthn authenticator
        return null;
      }
      isUserIdentified = true;
      form.setAttribute(WebAuthnConstants.ALLOWED_AUTHENTICATORS, authenticators);
    } else {
      // in ID-less & Password-less Scenario
      // NOP
    }
    form.setAttribute(WebAuthnConstants.IS_USER_IDENTIFIED, Boolean.toString(isUserIdentified));

    // read options from policy
    String userVerificationRequirement = policy.getUserVerificationRequirement();
    form.setAttribute(WebAuthnConstants.USER_VERIFICATION, userVerificationRequirement);
    form.setAttribute(WebAuthnConstants.SHOULD_DISPLAY_AUTHENTICATORS, shouldDisplayAuthenticators(context));
    return form;
  }

  // validates user data transmitted as form parameters
  @Override
  public void action(AuthenticationFlowContext context) {
    // Retrieve parameters from incoming http request.
    MultivaluedMap<String, String> params = context.getHttpRequest().getDecodedFormParameters();

    // check if user tries to sign in with webauthn(passkey)
    boolean isPasskeyLogin = isPasskeyLogin(params);
    if (isPasskeyLogin) {
      // Check if webauthn failed
      boolean webAuthnFailed = hasWebAuthnFailed(params);
      if (webAuthnFailed) {
        // Webauthn inserts the error in the http request.
        String error = params.getFirst(WebAuthnConstants.ERROR);
        handleWebauthnError(context, error);
        return;
      }
      // verify webauthn challenge response. If successful, the user has successfully signed in to their user account
      verifyWebauthnChallengeResponse(context, params);
      return;
    }

    // user wants to sign in with username and password
    String username = params.getFirst(USERNAME_KEY).trim();
    UserModel user = retrieveUser(context, username);

    // no user with this username has been found
    if (user == null) {
      handleInvalidUsernameError(context);
    } else {
      boolean noPassword = hasNoPasswordSetup(user);
      if (noPassword) {
        handleNoPasswordError(context);
        return;
      }

      //User is required for the built-in password form authenticator to work: org.keycloak.authentication.authenticators.browser.PasswordForm
      context.setUser(user);
      //Call attempted to signal keycloak to call the next "Alternative" in the authentication flow.
      context.attempted();
    }
  }
  ...
}isPasskeyLogin: Theparamsargument holds the form data submitted by the user. This method is used to determine whether the user has attempted to sign in with passkey. It checks for occurrences of certain WebAuthn values in the form data, which are only submitted if the user has attempted to sign in with passkey.
private boolean isPasskeyLogin(MultivaluedMap<String, String> params) {
   return (params.getFirst(WebAuthnConstants.CREDENTIAL_ID) != null && params.getFirst(WebAuthnConstants.AUTHENTICATOR_DATA) != null && params.getFirst(WebAuthnConstants.CLIENT_DATA_JSON) != null
           && params.getFirst(WebAuthnConstants.SIGNATURE) != null && params.getFirst(WebAuthnConstants.USER_HANDLE) != null) || hasWebAuthnFailed(params);
}
hasWebAuthnFailed: Theparamsargument holds the form data submitted by the user. This method determines whether WebAuthn has failed on the client-side. It checks whether an error value was transmitted in the form data.
private boolean hasWebAuthnFailed(MultivaluedMap<String, String> params) {
        String error = params.getFirst(WebAuthnConstants.ERROR);
        if (error != null) {
            return !error.isEmpty();
        }
        return false;
}handleWebauthnError: Once WebAuthn has failed, the authentication ceremony is over. This method restarts the authentication ceremony by creating a new WebAuthn challenge. The user is also informed about why WebAuthn failed.
private void handleWebauthnError(AuthenticationFlowContext context, String error) {
        LoginFormsProvider form = createLoginFormWithWebauthnChallenge(context);
        if (form != null) {
            context.failureChallenge(AuthenticationFlowError.INVALID_CREDENTIALS,
                    form.setError(error).createForm(TPL_CODE));
        }
}verifyWebauthnChallengeResponse: This method verifies the challenge response’s (Authentication Assertion) validity. The verification implementation is almost identical to theactionmethod of the built-inWebAuthnAuthenticatorclass. We had to slightly change the implementation to render our custom ftl instead of the built-in ftl in case of a validation error.
// verify webauthn challenge response. If successful, the user has successfully signed in to their user account.
// Copied from org.keycloak.authentication.authenticators.browser.WebAuthnAuthenticator#action. Difference: Error message can be displayed on our custom "ftl"-file
private void verifyWebauthnChallengeResponse(AuthenticationFlowContext context, MultivaluedMap<String, String> params) {
    context.getEvent().detail(Details.CREDENTIAL_TYPE, getCredentialType());

    String baseUrl = UriUtils.getOrigin(context.getUriInfo().getBaseUri());
    String rpId = getRpID(context);

    Origin origin = new Origin(baseUrl);
    Challenge challenge = new DefaultChallenge(context.getAuthenticationSession().getAuthNote(WebAuthnConstants.AUTH_CHALLENGE_NOTE));
    ServerProperty server = new ServerProperty(origin, rpId, challenge, null);

    byte[] credentialId = Base64Url.decode(params.getFirst(WebAuthnConstants.CREDENTIAL_ID));
    byte[] clientDataJSON = Base64Url.decode(params.getFirst(WebAuthnConstants.CLIENT_DATA_JSON));
    byte[] authenticatorData = Base64Url.decode(params.getFirst(WebAuthnConstants.AUTHENTICATOR_DATA));
    byte[] signature = Base64Url.decode(params.getFirst(WebAuthnConstants.SIGNATURE));

    final String userHandle = params.getFirst(WebAuthnConstants.USER_HANDLE);
    final String userId;
    // existing User Handle means that the authenticator used Resident Key supported public key credential
    if (userHandle == null || userHandle.isEmpty()) {
      // Resident Key not supported public key credential was used
      // so rely on the user set in a previous step (if available)
      if (context.getUser() != null) {
        userId = context.getUser().getId();
      } else {
        setErrorResponse(context, WEBAUTHN_ERROR_USER_NOT_FOUND,
                "Webauthn credential provided doesn't include user id and user id wasn't provided in a previous step");
        return;
      }
    } else {
      // decode using the same charset as it has been encoded (see: WebAuthnRegister.java)
      userId = new String(Base64Url.decode(userHandle), StandardCharsets.UTF_8);
      if (context.getUser() != null) {
        // Resident Key supported public key credential was used,
        // so need to confirm whether the already authenticated user is equals to one authenticated by the webauthn authenticator
        String firstAuthenticatedUserId = context.getUser().getId();
        if (firstAuthenticatedUserId != null && !firstAuthenticatedUserId.equals(userId)) {
          context.getEvent()
                  .detail(WebAuthnConstants.FIRST_AUTHENTICATED_USER_ID, firstAuthenticatedUserId)
                  .detail(WebAuthnConstants.AUTHENTICATED_USER_ID, userId);
          setErrorResponse(context, WEBAUTHN_ERROR_DIFFERENT_USER, null);
          return;
        }
      } else {
        // Resident Key supported public key credential was used,
        // and the user has not yet been identified
        // so rely on the user authenticated by the webauthn authenticator
        // NOP
      }
    }

    boolean isUVFlagChecked = false;
    String userVerificationRequirement = getWebAuthnPolicy(context).getUserVerificationRequirement();
    if (WebAuthnConstants.OPTION_REQUIRED.equals(userVerificationRequirement)) isUVFlagChecked = true;

    UserModel user = session.users().getUserById(context.getRealm(), userId);

    AuthenticationRequest authenticationRequest = new AuthenticationRequest(
            credentialId,
            authenticatorData,
            clientDataJSON,
            signature
    );

    WebAuthnCredentialModelInput.KeycloakWebAuthnAuthenticationParameters authenticationParameters = new WebAuthnCredentialModelInput.KeycloakWebAuthnAuthenticationParameters(
            server,
            isUVFlagChecked
    );

    WebAuthnCredentialModelInput cred = new WebAuthnCredentialModelInput(getCredentialType());

    cred.setAuthenticationRequest(authenticationRequest);
    cred.setAuthenticationParameters(authenticationParameters);
    String encodedCredentialID = Base64Url.encode(credentialId);

    if (user == null) {
      context.getEvent()
              .detail(WebAuthnConstants.AUTHENTICATED_USER_ID, userId)
              .detail(WebAuthnConstants.PUBKEY_CRED_ID_ATTR, encodedCredentialID);
      setErrorResponse(context, WEBAUTHN_ERROR_USER_NOT_FOUND, null);
      return;
    }

    boolean result = false;
    try {
      result = user.credentialManager().isValid(cred);
    } catch (WebAuthnException wae) {
      setErrorResponse(context, WEBAUTHN_ERROR_AUTH_VERIFICATION, wae.getMessage());
      return;
    }

    if (result) {
      String isUVChecked = Boolean.toString(isUVFlagChecked);
      context.setUser(user);
      context.getEvent()
              .detail(WebAuthnConstants.USER_VERIFICATION_CHECKED, isUVChecked)
              .detail(WebAuthnConstants.PUBKEY_CRED_ID_ATTR, encodedCredentialID);
      context.success();
    } else {
      context.getEvent()
              .detail(WebAuthnConstants.AUTHENTICATED_USER_ID, userId)
              .detail(WebAuthnConstants.PUBKEY_CRED_ID_ATTR, encodedCredentialID);
      setErrorResponse(context, WEBAUTHN_ERROR_USER_NOT_FOUND, null);
    }
}retrieveUser: This method retrieves the user account associated with theusernameparameter in the current realm. If there is no user under this username, this method returns null.
private UserModel retrieveUser(AuthenticationFlowContext context, String username) {
        context.getEvent().detail(Details.USERNAME, username);
        context.getAuthenticationSession().setAuthNote(AbstractUsernameFormAuthenticator.ATTEMPTED_USERNAME, username);
        UserModel user;
        try {
            user = KeycloakModelUtils.findUserByNameOrEmail(context.getSession(), context.getRealm(), username);
        } catch (ModelDuplicateException mde) {
            throw new RuntimeException(mde);
        }
        return user;
}handleInvalidUsernameError: This method restarts the authentication ceremony by creating a new WebAuthn challenge. The user is also informed that no account has been found under this username.
private void handleInvalidUsernameError(AuthenticationFlowContext context) {
        LoginFormsProvider form = createLoginFormWithWebauthnChallenge(context);
        if (form != null) {
            context.failureChallenge(AuthenticationFlowError.INVALID_CLIENT_CREDENTIALS,
                    form.setErrors(List.of(new FormMessage(RegistrationPage.FIELD_USERNAME, Messages.INVALID_USERNAME))).createForm(TPL_CODE));
        }
}hasNoPasswordSetup: This method checks if auserhas set up a password for their account.
 private boolean hasNoPasswordSetup(UserModel user) {
        List<CredentialModel> credentialModels = user.credentialManager().getStoredCredentialsStream().collect(Collectors.toList());
        return !credentialModels.stream().anyMatch((cred -> cred.getType().equals(PasswordCredentialModel.TYPE)));
}handleNoPasswordError: This method restarts the authentication ceremony by creating a new WebAuthn challenge. The user is also informed that there is no password set up for their account.
private void handleNoPasswordError(AuthenticationFlowContext context) {
    LoginFormsProvider form = createLoginFormWithWebauthnChallenge(context);
    if (form != null) {
      context.failureChallenge(AuthenticationFlowError.INVALID_CREDENTIALS,
              form.setError("This user has not setup a password").createForm(TPL_CODE));
    }
}
Template: passkey-login-form.ftl
At the beginning of the browser-flow, this page (custom login page) is displayed to the user. It shows two options for signing in, either with username or with passkey. The source code of this ftl is a mixture from the built-in login.ftl and webauthn-authenticate.ftl files.
login.ftl: From the built-inlogin.ftlwe took only its html source code. We removed the password field and added theSign in with Passkeybutton, which is displayed only if the current browser supports WebAuthn (checked with javascript!window.PublicKeyCredential).webauthn-authenticate.ftl: From the built-inwebauthn-authenticate.ftlwe mainly took over its javascript code, which provides the necessary WebAuthn API calls to create the Authentication Assertions. The form with idwebauthis used to submit the authentication assertion.
<#import "template.ftl" as layout>
<@layout.registrationLayout displayMessage=!messagesPerField.existsError('username') displayInfo=(realm.password && realm.registrationAllowed && !registrationDisabled??); section>
    <#if section = "header">
        ${msg("loginAccountTitle")}
    <#elseif section = "form">
        <div id="kc-form">
            <form id="webauth" action="${url.loginAction}" method="post">
                <input type="hidden" id="clientDataJSON" name="clientDataJSON"/>
                <input type="hidden" id="authenticatorData" name="authenticatorData"/>
                <input type="hidden" id="signature" name="signature"/>
                <input type="hidden" id="credentialId" name="credentialId"/>
                <input type="hidden" id="userHandle" name="userHandle"/>
                <input type="hidden" id="error" name="error"/>
            </form>
            <div id="kc-form-wrapper">
                <#if realm.password>
                    <form id="kc-form-login" onsubmit="login.disabled = true; return true;" action="${url.loginAction}"
                          method="post">
                        <#if !usernameHidden??>
                            <div class="${properties.kcFormGroupClass!}">
                                <label for="username"
                                       class="${properties.kcLabelClass!}"><#if !realm.loginWithEmailAllowed>${msg("username")}<#elseif !realm.registrationEmailAsUsername>${msg("usernameOrEmail")}<#else>${msg("email")}</#if></label>

                                <input tabindex="1" id="username"
                                       aria-invalid="<#if messagesPerField.existsError('username')>true</#if>"
                                       class="${properties.kcInputClass!}" name="username"
                                       value=""
                                       type="text" autofocus autocomplete="off"/>

                                <#if messagesPerField.existsError('username')>
                                    <span id="input-error-username" class="${properties.kcInputErrorMessageClass!}"
                                          aria-live="polite">
                                        ${kcSanitize(messagesPerField.get('username'))?no_esc}
                                    </span>
                                </#if>
                            </div>
                        </#if>

                        <div class="${properties.kcFormGroupClass!} ${properties.kcFormSettingClass!}">
                            <div id="kc-form-options">
                                <#if realm.rememberMe && !usernameHidden??>
                                    <div class="checkbox">
                                        <label>
                                            <#if login.rememberMe??>
                                                <input tabindex="3" id="rememberMe" name="rememberMe" type="checkbox"
                                                       checked> ${msg("rememberMe")}
                                            <#else>
                                                <input tabindex="3" id="rememberMe" name="rememberMe"
                                                       type="checkbox"> ${msg("rememberMe")}
                                            </#if>
                                        </label>
                                    </div>
                                </#if>
                            </div>
                        </div>

                        <div id="kc-form-buttons" class="${properties.kcFormGroupClass!}">
                            <input tabindex="4"
                                   class="${properties.kcButtonClass!} ${properties.kcButtonPrimaryClass!} ${properties.kcButtonBlockClass!} ${properties.kcButtonLargeClass!}"
                                   name="login" id="kc-login" type="submit" value="Continue"/>
                        </div>
                    </form>
                    <div id="showPasskeyOption">
                        <div style="border-bottom: 1px solid;  text-align: center;  height: 10px; margin-bottom: 10px; margin-top: 10px;">
                            <span style="background: #fff; padding: 0 5px;">Other Sign in Options</span>
                        </div>
                        <div id="kc-form-buttons" class="${properties.kcFormGroupClass!}">
                            <input tabindex="4"
                                   class="${properties.kcButtonClass!} ${properties.kcButtonPrimaryClass!} ${properties.kcButtonBlockClass!} ${properties.kcButtonLargeClass!}"
                                   name="login" id="kc-login" type="submit" value="Sign in with Passkey"
                                   onclick="webAuthnAuthenticate()"/>
                        </div>
                    </div>
                </#if>
            </div>
        </div>

    <#elseif section = "info" >
        <#if realm.password && realm.registrationAllowed && !registrationDisabled??>
            <div id="kc-registration">
                <span>${msg("noAccount")} <a tabindex="6" href="${url.registrationUrl}">${msg("doRegister")}</a></span>
            </div>
        </#if>
    <#elseif section = "socialProviders" >
        <#if realm.password && social.providers??>
            <div id="kc-social-providers" class="${properties.kcFormSocialAccountSectionClass!}">
                <hr/>
                <h4>${msg("identity-provider-login-label")}</h4>

                <ul class="${properties.kcFormSocialAccountListClass!} <#if social.providers?size gt 3>${properties.kcFormSocialAccountListGridClass!}</#if>">
                    <#list social.providers as p>
                        <a id="social-${p.alias}"
                           class="${properties.kcFormSocialAccountListButtonClass!} <#if social.providers?size gt 3>${properties.kcFormSocialAccountGridItem!}</#if>"
                           type="button" href="${p.loginUrl}">
                            <#if p.iconClasses?has_content>
                                <i class="${properties.kcCommonLogoIdP!} ${p.iconClasses!}" aria-hidden="true"></i>
                                <span class="${properties.kcFormSocialAccountNameClass!} kc-social-icon-text">${p.displayName!}</span>
                            <#else>
                                <span class="${properties.kcFormSocialAccountNameClass!}">${p.displayName!}</span>
                            </#if>
                        </a>
                    </#list>
                </ul>
            </div>
        </#if>
    </#if>
    <script type="text/javascript" src="${url.resourcesCommonPath}/node_modules/jquery/dist/jquery.min.js"></script>
    <script type="text/javascript" src="${url.resourcesPath}/js/base64url.js"></script>
    <script type="text/javascript">
        if (!window.PublicKeyCredential) {
            if (document.getElementById("showPasskeyOption") != null) {
                document.getElementById("showPasskeyOption").style.display = "none";
                console.log("Webauthn not supported")
            }
        }

        function webAuthnAuthenticate() {
            let isUserIdentified = ${isUserIdentified};
            if (!isUserIdentified) {
                doAuthenticate([]);
                return;
            }
            checkAllowCredentials();
        }

        function checkAllowCredentials() {
            let allowCredentials = [];
            let authn_use = document.forms['authn_select'].authn_use_chk;

            if (authn_use !== undefined) {
                if (authn_use.length === undefined) {
                    allowCredentials.push({
                        id: base64url.decode(authn_use.value, {loose: true}),
                        type: 'public-key',
                    });
                } else {
                    for (let i = 0; i < authn_use.length; i++) {
                        allowCredentials.push({
                            id: base64url.decode(authn_use[i].value, {loose: true}),
                            type: 'public-key',
                        });
                    }
                }
            }
            doAuthenticate(allowCredentials);
        }


        function doAuthenticate(allowCredentials) {

            // Check if WebAuthn is supported by this browser
            if (!window.PublicKeyCredential) {
                $("#error").val("${msg("webauthn-unsupported-browser-text")?no_esc}");
                $("#webauth").submit();
                return;
            }

            let challenge = "${challenge}";
            let userVerification = "${userVerification}";
            let rpId = "${rpId}";
            let publicKey = {
                rpId: rpId,
                challenge: base64url.decode(challenge, {loose: true})
            };

            let createTimeout = ${createTimeout};
            if (createTimeout !== 0) publicKey.timeout = createTimeout * 1000;

            if (allowCredentials.length) {
                publicKey.allowCredentials = allowCredentials;
            }

            if (userVerification !== 'not specified') publicKey.userVerification = userVerification;

            navigator.credentials.get({publicKey})
                .then((result) => {
                    window.result = result;

                    let clientDataJSON = result.response.clientDataJSON;
                    let authenticatorData = result.response.authenticatorData;
                    let signature = result.response.signature;

                    $("#clientDataJSON").val(base64url.encode(new Uint8Array(clientDataJSON), {pad: false}));
                    $("#authenticatorData").val(base64url.encode(new Uint8Array(authenticatorData), {pad: false}));
                    $("#signature").val(base64url.encode(new Uint8Array(signature), {pad: false}));
                    $("#credentialId").val(result.id);
                    if (result.response.userHandle) {
                        $("#userHandle").val(base64url.encode(new Uint8Array(result.response.userHandle), {pad: false}));
                    }
                    $("#webauth").submit();
                })
                .catch((err) => {
                    $("#error").val(err);
                    $("#webauth").submit();
                })
            ;
        }
    </script>
</@layout.registrationLayout>
Device Support
Please refer to Passkey Matrix to check for compatibility.