Tutorial 5 - Custom Keycloak container image
What are we doing?
We build a custom Keycloak container image, which contains specific extensions.
We show how the official Keycloak distributions (from Maven Central and Quay) can be consumed and extended with custom enhancements. The result is a newly built container image, which can be used in any container runtime environment (e.g., Kubernetes). We will use Keycloak.X, which since version 17 is based on the Quarkus runtime.
There are similar projects available on the internet:
Why are we doing this?
We love Keycloak for its openness. It can easily grow with evolving requirements. Keycloak provides a large set of functionality out-of-the-box. The true power of Keycloak can be unleashed by community extensions or by extending it yourself. The resulting custom Keycloak should be delivered as a container image for a simple handling in the deployment process.
Requirements
You need to install the following components to follow the tutorial:
- Java JDK 21
- Docker Host
- Docker compose
- jq
Steps
This tutorial is based on our public Keycloak-Custom repo on GitHub.
Now please create your own new custom Keycloak project by either cloning, forking or using the template feature Use this template of the Keycloak-Custom GitHub repo.
Then open the new repository with your favourite Java IDE. For the IntelliJ IDE, we provide ready to use run configurations, which are explained in the usage section.
The steps of this tutorial are grouped around the modules of the Keycloak-Custom multi-module project. Each module fulfils a specific task for building the custom Keycloak container image:
- Step 1: module server: provides a Keycloak installation for local development
- Step 2: module config: provides the build stage configuration and the Keycloak setup
- Step 3: module docker-compose: provides a sample for launching the custom container image
- Step 4: module extensions: provides samples for Keycloak SPI implementations
- Step 5: module themes: provides samples for custom Keycloak themes
- Step 6: module container: creates the container image
In the following sections, we explain step-by-step the purpose and the content of all the modules of the project.
If you first want to see the up & running result of the custom Keycloak, just follow the Quick Start section below.
In the final section, we will explain different ways for starting our custom Keycloak from within this project.
Quick Start
The quickest way to enjoy the custom Keycloak build by this project is to execute the 4 commands below.
- Build the project:
./mvnw clean package[INFO] ------------------------------------------------------------------------
[INFO] Reactor Summary for parent 1.0.0-SNAPSHOT:
[INFO]
[INFO] parent ............................................. SUCCESS [ 0.197 s]
[INFO] server ............................................. SUCCESS [ 2.399 s]
[INFO] config ............................................. SUCCESS [ 0.837 s]
[INFO] extensions ......................................... SUCCESS [ 0.002 s]
[INFO] extension-no-op-authenticator ...................... SUCCESS [ 0.685 s]
[INFO] extension-no-op-protocol-mapper .................... SUCCESS [ 0.137 s]
[INFO] themes ............................................. SUCCESS [ 0.047 s]
[INFO] container .......................................... SUCCESS [ 0.197 s]
[INFO] docker-compose ..................................... SUCCESS [ 0.758 s]
[INFO] ------------------------------------------------------------------------
[INFO] BUILD SUCCESS
[INFO] ------------------------------------------------------------------------
[INFO] Total time: 5.375 s
[INFO] Finished at: 2022-10-26T17:28:39+02:00
[INFO] ------------------------------------------------------------------------- Start the PostgreSQL container:
docker compose -f ./docker-compose/postgres/docker-compose.yml uppostgres_1 |
postgres_1 | PostgreSQL init process complete; ready for start up.
postgres_1 |
postgres_1 | 2022-10-27 17:02:51.146 UTC [1] LOG: starting PostgreSQL 13.8 on aarch64-unknown-linux-musl, compiled by gcc (Alpine 11.2.1_git20220219) 11.2.1 20220219, 64-bit
postgres_1 | 2022-10-27 17:02:51.146 UTC [1] LOG: listening on IPv4 address "0.0.0.0", port 5432
postgres_1 | 2022-10-27 17:02:51.146 UTC [1] LOG: listening on IPv6 address "::", port 5432
postgres_1 | 2022-10-27 17:02:51.155 UTC [1] LOG: listening on Unix socket "/var/run/postgresql/.s.PGSQL.5432"
postgres_1 | 2022-10-27 17:02:51.193 UTC [49] LOG: database system was shut down at 2022-10-27 17:02:51 UTC
postgres_1 | 2022-10-27 17:02:51.227 UTC [1] LOG: database system is ready to accept connections- Start the new custom Keycloak from the
servermodule locally by a shell script:
./server/run-keycloak.shBecause the two environment variables KC_BOOTSTRAP_ADMIN_USERNAME and KC_BOOTSTRAP_ADMIN_PASSWORD are defined in the docker-compose/src/main/resources/keycloak.common.env file, an initial user is created during the startup of Keycloak. We strongly advise moving these 2 properties from the keycloak.common.env file to the secrets.env file.
- Start the setup of the running Keycloak instance:
./server/run-keycloak-setup.shWeb Admin Console
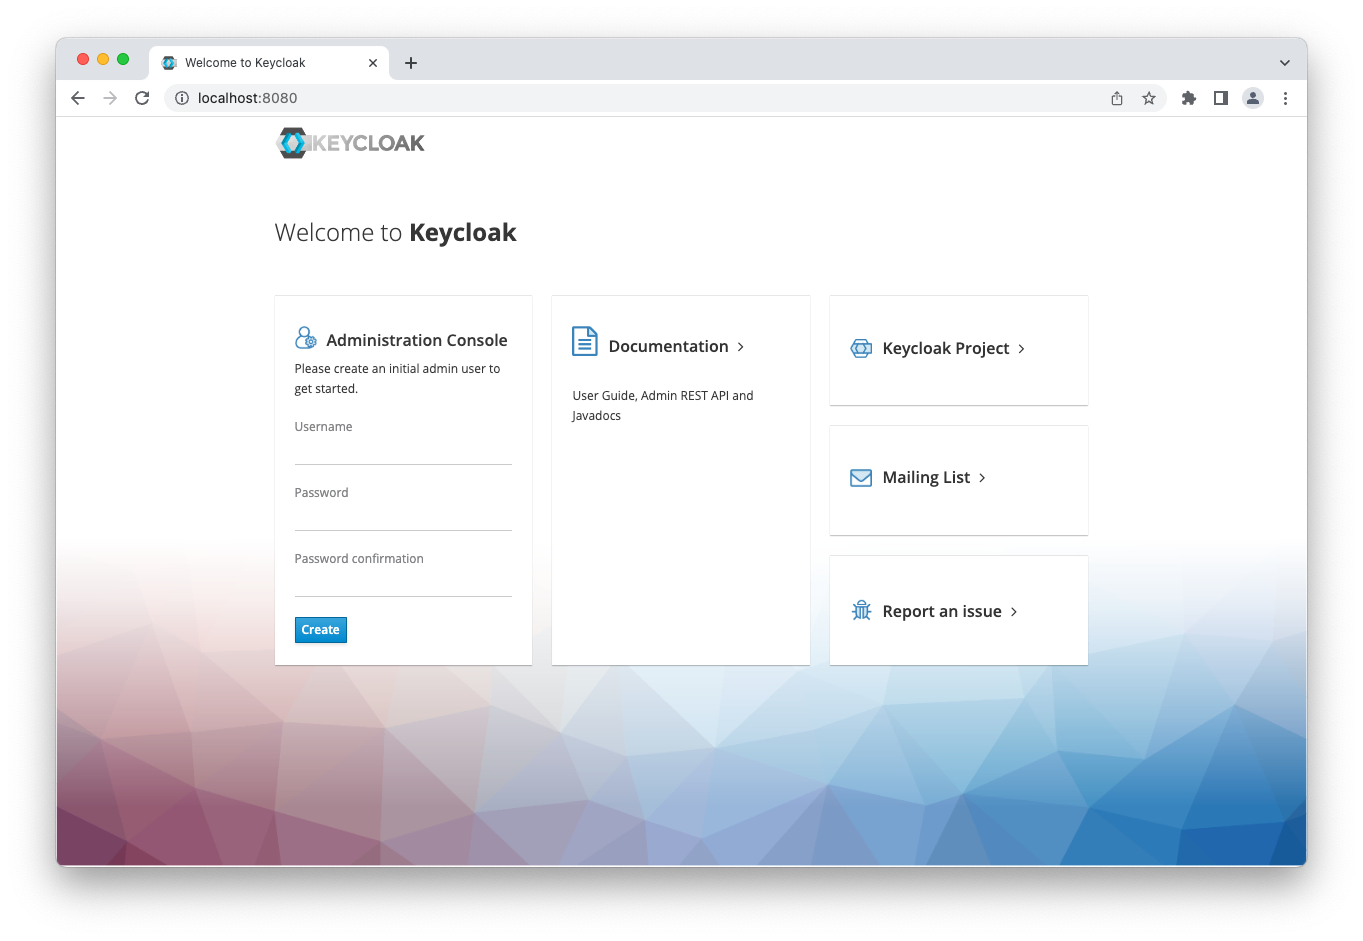
Now you can access the Web Admin Console at http://localhost:8080/ with user temp-admin and password admin (as initially defined in docker-compose/src/main/resources/keycloak.common.env) and find the already created new realms example1 and example2.
User Login
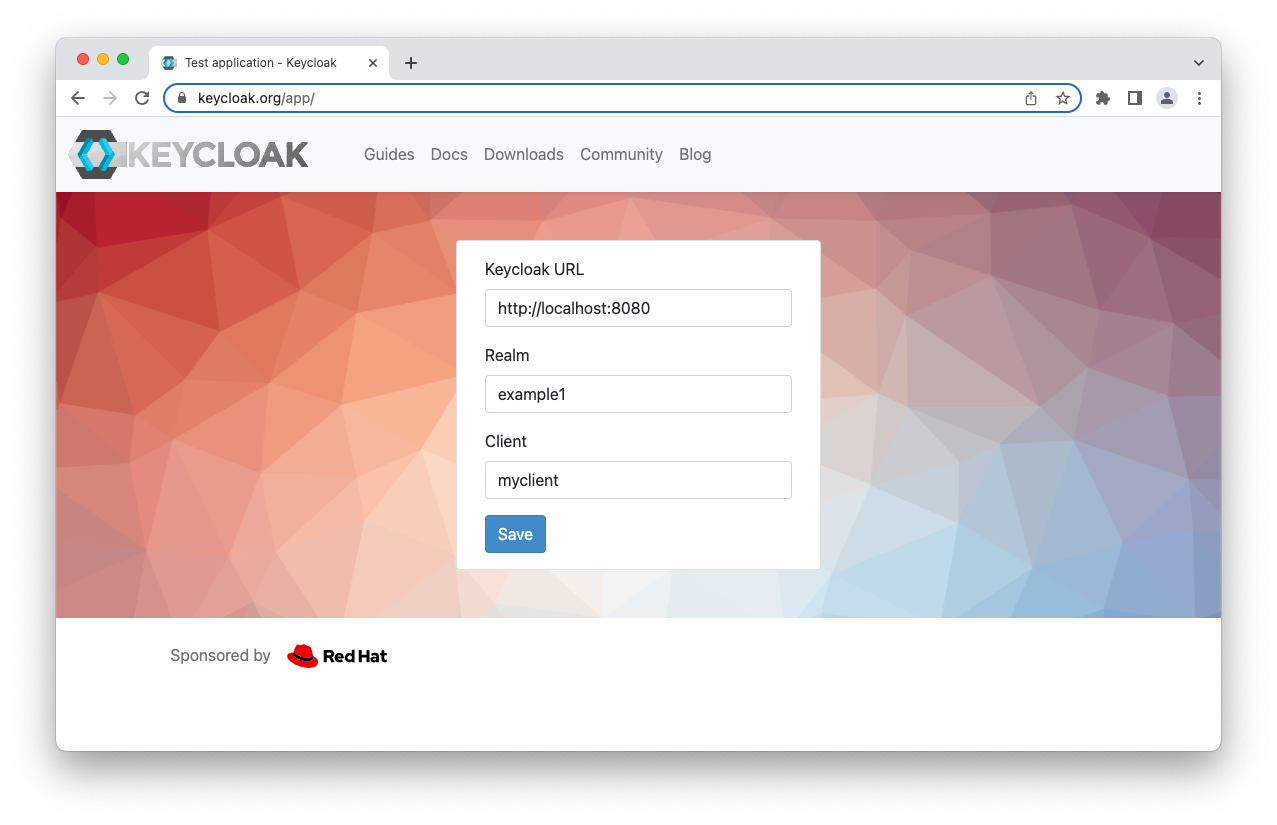
If you want to see the result from a user perspective, you can use the testing application provide by Keycloak at https://www.keycloak.org/app/.
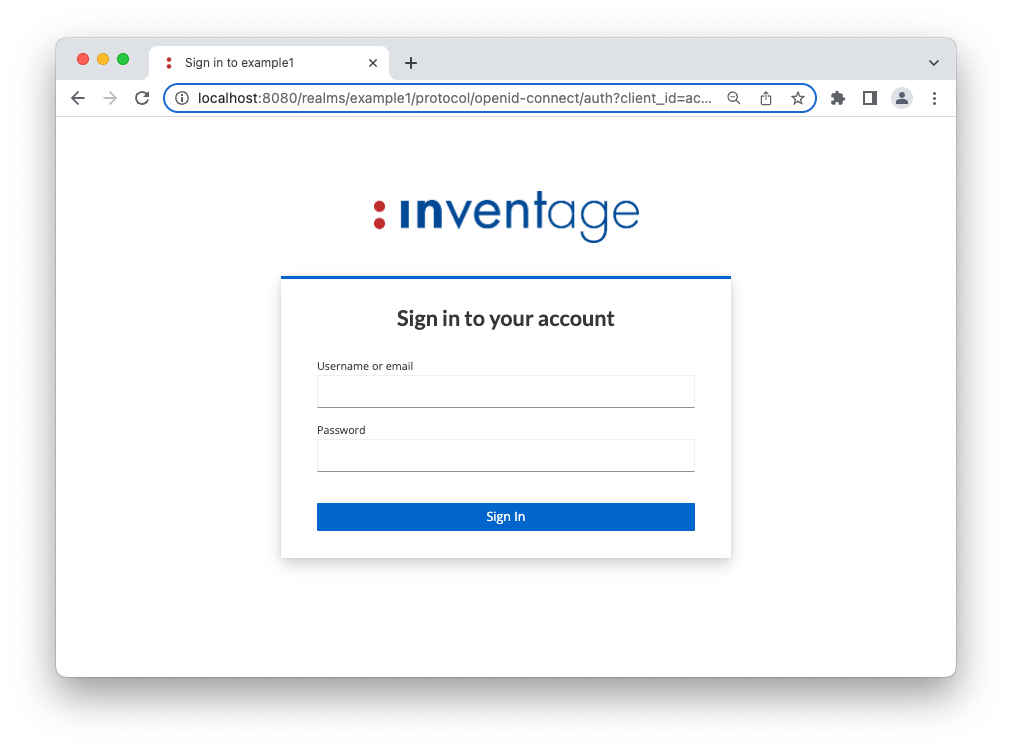
It is worth noting that you have to change the realm to example1 as shown below:
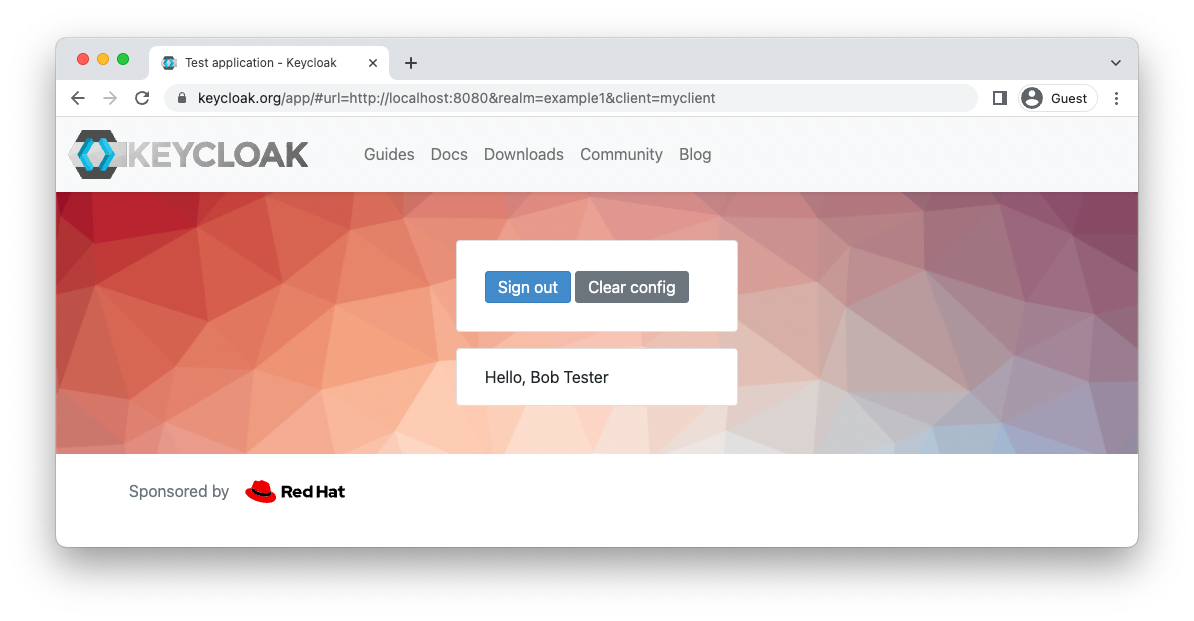
After clicking the Save and then the Sign in button, you will be prompted to enter your username/password or to register a new user.
You should see a welcome screen with your first- and last-name when signed in successfully
Congratulation! By applying the above commands you have installed, build, configured, started and used a custom Keycloak instance. The Quick Start ends here. We suggest stopping the Keycloak instance now to proceed with the steps to get more insights.
Keycloak Container
Instead of running the custom Keycloak from the server module, it is also straightforward to use the new created container.
Please note, if Keycloak is running within a container, the JDBC URL for the PostgreSQL connection must be changed from hostname localhost to either the service name (if running in the same docker network) or to host.docker.internal (if the port is exposed there). This change can be done by copying the KC_DB_URL property from docker-compose/src/main/resources/keycloak.common.env and overriding it in the docker-compose/src/main/resources/keycloak.specific.env file with the hostname host.docker.internal.
Then just execute
./mvnw clean installand run
docker compose -f docker-compose/target/keycloak/docker-compose.yml upIf you want to proceed with the steps below, please stop the Keycloak container now and revert the override of the KC_DB_URL property.
Step 1: module server
This module installs the official Keycloak distribution via a Maven dependency into the server/target/keycloak folder. This directory will be referenced as ${keycloak.dir} from now on.
The following Maven command executes the installation:
./mvnw clean initializeAfter a successful execution, the newly created Keycloak installation can be started with the factory settings by executing the ./kc.sh start-dev script from the ${keycloak.dir}/bin directory. Afterwards, we can create the initial administrative user at http://localhost:8080/ to access the Web Admin Console.
Instead of using the factory settings, we want to use custom settings, which should be defined by environment variables.
For passing a defined set of environment variables, when using our custom configuration, we will store them in .env files (described in step 2 module config) and later use a wrapper script from this module instead of launching Keycloak by the kc.sh script directly.
Step 2: module config
This module contains all configuration and setup files for our custom Keycloak. It copies these files during the Maven generate-resources phase to the Keycloak installation directory (${keycloak.dir}) of the server module. This can be done by running the following command:
./mvnw clean generate-resourcesThe directory structure of ${keycloak.dir} will now also contain the content of the 3 directories bin, conf and setup from this module.
For the moment, you don’t have to do or change anything within this module. We will just explain the content of the config module so that you are prepared for making changes later.
We differentiate between the configuration and the setup of Keycloak. The configuration is responsible to provide all necessary environment variables when Keycloak is launched. The setup requires an up & running instance of Keycloak and creates various objects within Keycloak by using the Admin CLI and REST API.
Configuration
With Keycloak.X and its Quarkus base the configuration of Keycloak is done in two stages: build stage and runtime stage (Quarkus Augmentation). A few properties can only be set in the build stage. If they must be changed, the kc.sh script must be executed with the build command. In development mode (see below) this build command is automatically executed during every start.
Build stage
In this project, all properties of the build stage are configured in the keycloak.conf at config/src/main/resources/keycloak/conf/ of the config module.
We set 4 build stage properties as default/example:
# db is the name of the database vendor: dev-file, dev-mem, mariadb, mssql, mysql, oracle, postgres
db=postgres

# features is a comma-separated list of features to be enabled
# https://www.keycloak.org/server/features
features=organization

# metrics-enabled is for exposing metrics (/metrics) endpoints
metrics-enabled=true

# health-enabled is for exposing health check (/health) endpoints
health-enabled=true
In the generate-resources phase of the Maven build, the keycloak.conf file is copied to ${keycloak.dir}.
Please see Keycloak/Guides/Server/All configuration/Build options for the list of all available build stage properties.
Runtime stage
All properties of the runtime stage are set as environment variables. For an easier handling within this project, we propose to use .env files (see step 3 below) for storing these environment variables. In a Kubernetes runtime, they are normally defined by corresponding env: entries in the manifests.
Please see Keycloak/Guides/Server/All configuration/Configuration for the list of all available runtime stage properties.
Besides using these Keycloak specific properties, it may be necessary to configure also other properties like Quarkus properties or properties from custom extensions.
Setup
The setup creates the required Keycloak objects (e.g. clients, authentication flows, protocol mappers and many more) within a running Keycloak instance. We strongly suggest doing this in a scripted manner and not interactively within the Web Admin Console of Keycloak. For that, we provide two ways, which can be used in parallel:
- by using the keycloak-config-cli
- by using the Keycloak Admin CLI
We have enhanced the entrypoint script kc.sh of the container so that the setup is executed every time the container is started. The enhanced script is called kc-with-setup.sh and is used as the ENTRYPOINT within the Dockerfile.
keycloak-config-cli
The keycloak-config-cli tool is a Keycloak utility to ensure the desired configuration state for a realm based on a JSON/YAML file. The format of the JSON/YAML file is based on the export realm format.
All *.json files located in the directory config/src/main/resources/keycloak/setup/ are used by keycloak-config-cli.
As an example, this project provides the sample realm-master.json file in the mentioned directory. It contains the following (abbreviated) content:
{
  "realm": "master",
  "enabled": true,
  "sslRequired": "$(env:REALM_MASTER_SSL_REQUIRED:-external)",
  "adminEventsEnabled": true,
  "adminEventsDetailsEnabled": true,
  "eventsEnabled": true,
  "eventsExpiration": 259200,
  "enabledEventTypes": […]
}
The master realm is configured with the above setup to capture both event types: user events and admin events. The save period is set to 259200 seconds (3 days). For admin events, the details are also saved.
As a second example, this project provides the realm-example1.json file. With this file, we create a new realm example1 with user registration enabled and with a new client myclient.
The example1 realm also contains our custom extensions and custom themes. See section Setup in step 4 and step 5 for the details.
{
  "id": "example1",
  "realm": "example1",
  "displayName": "$(env:EXAMPLE1_DISPLAY_NAME:-Example One)",
  "enabled": true,
  "registrationAllowed": true,
  "adminEventsEnabled": true,
  "adminEventsDetailsEnabled": true,
  "eventsEnabled": true,
  "eventsExpiration": 259200,
  "enabledEventTypes": […],
  "loginTheme": "inventage",
  "accountTheme": "inventage.v2",
  "authenticationFlows": […],
  "browserFlow": "browser2",
  "clients": […]
}
Please just delete the realm-example1.json from your custom Keycloak project if you don’t need the example1 realm.
Within in the keycloak-setup.sh shell script, the keycloak-config-cli is executed with the following command:
  java -jar "${BASEDIR}"/client/keycloak-config-cli-"${keycloak-config-cli.version}".jar \
    --keycloak.url=http://localhost:8080/ \
    --keycloak.ssl-verify=true \
    --keycloak.availability-check.enabled=true \
    --keycloak.availability-check.timeout=300s \
    --import.var-substitution.enabled=true \
    --import.managed.client=no-delete \
    --import.managed.client-scope=no-delete \
    --import.managed.client-scope-mapping=no-delete \
    --import.files.locations="${BASEDIR}"/../setup/*.json \
    --logging.level.root=info \
    --logging.level.keycloak-config-cli=info \
    --logging.level.realm-config=info
The above Java command is shown here just for information about which options we use.
Keycloak CLI
The keycloak-setup shell script also sources the two shell scripts: keycloak-cli-helpers.sh and keycloak-cli-custom.sh. The first script defines reusable functions for making the usage of the Keycloak Admin CLI easier. The keycloak-cli-custom.sh script is for project-specific Keycloak Admin CLI calls. By default, this script contains no CLI calls. In the example below, the keycloak-cli-custom.sh script is changed so that a new realm example2 with a new client client1 and a new user user1 is created:
#!/usr/bin/env bash

trap 'exit' ERR

echo ""
echo "----------------- keycloak_custom_config.sh ---------------"
echo ""

# example for adding a realm, client and user
createRealm example2
createClient example2 client1
createUser example2 user1
The 3 functions createRealm, createClient and createUser are defined in the keycloak-cli-helpers.sh script.
We advise against using this script too extensively because every call to ${KCADM} (kcadm.sh) within the keycloak-cli-custom.sh will start a new JVM. This has performance impacts during the startup of Keycloak.
The jq tool mentioned above as a prerequisite is used in the keycloak-cli-helpers.sh for handling the JSON result of the Keycloak Admin CLI calls.
Step 3: module docker-compose
For an easy launch of the custom container image, we provide a docker-compose.yml file. During the build the Maven variables inside this file are substituted and the final file, which can be used by the docker-compose command, is placed under target/classes/keycloak of this module.
In addition to the docker-compose.yml file, this module also contains the aforementioned .env files for storing the environment variables. These .env files are referenced in the docker-compose.yml file.
Even if you don’t plan to use docker compose, we advise you to still use the .env files here because we use them as a single point of configuration as well as for launching Keycloak as a Java process directly from the IntelliJ IDE.
Environment variable files
We are using three .env files (in ./docker-compose/src/main/resources) for maintaining the environment variables:
keycloak.common.envkeycloak.specific.envsecrets.env
These 3 files are also used when Keycloak is started with the launch procedures described in the usage section. The environment variables can be overridden by re-declaring them in another file (as explained later on in this section of the tutorial).
keycloak.common.env
All default values are defined here.
The following excerpt shows the environment variables and its default values for the database connection of Keycloak and the Quarkus environment variable for enabling the access log:
# KC_DB_URL is the full database JDBC URL
KC_DB_URL=jdbc:postgresql://localhost:15432/postgres

# KC_DB_USERNAME is the username used for the JDBC connection
KC_DB_USERNAME=postgres

# KC_DB_PASSWORD is the password used for the JDBC connection
KC_DB_PASSWORD=postgres

# QUARKUS_HTTP_ACCESS_LOG_ENABLED is for enabling the request logging via standard logging facility
QUARKUS_HTTP_ACCESS_LOG_ENABLED=true
Please note, that the value of the KC_DB_URL property is using the hostname localhost because we assume that the custom Keycloak runs locally. Further, we assume that the PostreSQL port is available on the docker host. When we launch Keycloak as a container, we will have to change the hostname to host.docker.internal. Within PostgreSQL, we use the default database object called postgres.
keycloak.specific.env
Environment-specific properties should be set in the keycloak.specific.env file. This file is not under version control and should be made available in every specific environment. It is also a good place for setting local values (e.g. for debugging) of some properties.
The following two (example) definitions are used for accessing the keycloak-custom database of the PostgreSQL running locally from a Keycloak instance running in a container and to set the global log level to info and the log level for all com.inventage Loggers to debug:
# connecting Keycloak from running inside a container to a Postgres server running on the docker host (macOS)
KC_DB_URL=jdbc:postgresql://host.docker.internal:15432/keycloak-custom

KC_LOG_LEVEL=info,com.inventage:debug
secrets.env
Sensitive properties can be stored in the secrets.env file. This file is not under version control and must be available when running docker-compose up with the provided docker-compose.yml file.
The two properties for creating the initial admin user for the master realm are good candidates for this file:
# KC_BOOTSTRAP_ADMIN_USERNAME, default is temp-admin
KC_BOOTSTRAP_ADMIN_USERNAME=temp-admin

# KC_BOOTSTRAP_ADMIN_PASSWORD
KC_BOOTSTRAP_ADMIN_PASSWORD=admin
Step 4: module extensions
One of the features of Keycloak we like the most is its extensibility through more than 100 service provider interfaces (SPI) and that Keycloak internally also uses these SPIs for implementing the standard functionality. This project wants to offer a simple start for developing such extensions.
This module acts as the container of all extensions within this custom Keycloak project. Every extension should be placed in its submodule. As an example of such an extension, we provide a new implementation of the Authenticator SPI of Keycloak. This extension is placed in the extension-no-op-authenticator submodule of the extensions module.
extension-no-op-authenticator
The Authenticator SPI of Keycloak allows extending the authentication flow by providing a pluggable component that holds the logic for performing an action within a flow. It is well documented in the official Keycloak Server Development documentation.
As the simplest example, we implement such a component, which can be added to any authentication flow and will just show a log output when executed. To achieve this, we must:
- implement the Authenticator SPI
- build the artefact
- deploy the artefact (
jarfile) within Keycloak - configure an authentication flow to use our component
This submodule shows all four activities.
Implementation
To implement the Authenticator SPI, we have to provide two classes implementing the following two interfaces:
org.keycloak.authentication.AuthenticatorFactoryorg.keycloak.authentication.Authenticator
And we have to register our class, which implements org.keycloak.authentication.AuthenticatorFactory, as a Java Service Provider. This can be done by a provider-configuration file for the Java Service Loader or by using the Google AutoService.
AuthenticatorFactory implementation
Our implementation of the AuthenticatorFactory interface is called NoOperationAuthenticatorFactory. The implementation contains mainly the ID of this provider, which will be later used within the setup. It also contains the possible requirement options within the authentication flow. Here we add all the available Enum values. The following snippet shows an excerpt of the implementation:
public class NoOperationAuthenticatorFactory implements AuthenticatorFactory {

    private static final String PROVIDER_ID = "no-operation-authenticator";

    private static final AuthenticationExecutionModel.Requirement[] REQUIREMENT_CHOICES = {
            AuthenticationExecutionModel.Requirement.REQUIRED,
            AuthenticationExecutionModel.Requirement.ALTERNATIVE,
            AuthenticationExecutionModel.Requirement.CONDITIONAL
    };

    @Override
    public AuthenticationExecutionModel.Requirement[] getRequirementChoices() {
        return REQUIREMENT_CHOICES;
    }

    @Override
    public String getId() { return PROVIDER_ID; }

    @Override
    public Authenticator create(KeycloakSession keycloakSession) { return new NoOperationAuthenticator(); }

    …
}
Authenticator implementation
The NoOperationAuthenticator class is our implementation of the Authenticator interface:
public class NoOperationAuthenticator implements Authenticator {

    private static final Logger LOG = Logger.getLogger(NoOperationAuthenticator.class);

    @Override
    public void authenticate(AuthenticationFlowContext authenticationFlowContext) {
        LOG.debugf("authenticate");
        authenticationFlowContext.success();
    }

    @Override
    public void action(AuthenticationFlowContext authenticationFlowContext) {
        LOG.debugf("action");
    }

    …
}
You will also find another example implementation of the Authenticator SPI within this repository.
SPI registration
The standard way for registering an SPI is by providing a file in the directory META-INF/services, which is exactly named after the provider interface. In our case, the name of the file must be org.keycloak.authentication.AuthenticatorFactory and has the name of our implementing class as its content:
com.inventage.keycloak.noopauthenticator.infrastructure.authenticator.NoOperationAuthenticatorFactory
An alternative way for registering an SPI is by using the Google AutoService with a simple Java annotation @AutoService on our class:
import com.google.auto.service.AutoService;

@AutoService(org.keycloak.authentication.AuthenticatorFactory.class)
public class NoOperationAuthenticatorFactory implements AuthenticatorFactory {
    ...
}
An additional dependency is necessary for the Google AutoService to be available, you will find the dependency in the top-level pom.xml within <dependencyManagement> and in the extension-no-op-authenticator/pom.xml:
<dependency>
    <groupId>com.google.auto.service</groupId>
    <artefactId>auto-service-annotations</artefactId>
    <version>${auto-service.version}</version>
</dependency>
The value for the version is defined by the auto-service.version Maven property. We use the property because the version value is needed in multiple places.
Build
During the Maven build, the resulting artefact for this submodule is created as a jar archive named extension-no-op-authenticator-1.0.0-SNAPSHOT.jar.
./mvnw clean packageFor every extension submodule, the resulting artefact is also copied to the directory ${keycloak.dir}/providers during the build.
Deployment
The resulting artefact must be copied to the providers directory of a Keycloak installation for its deployment. This procedure is automated in this module upon the package Maven build phase, so that the jar archive is replaced in the ${keycloak.dir}/providers directory with every Maven build.
We suggest to always check if the extensions installed in the providers directory are also available in the running Keycloak instance. This can only be seen by selecting the master realm in the drop-down menu and then navigating to the Provider info tab:
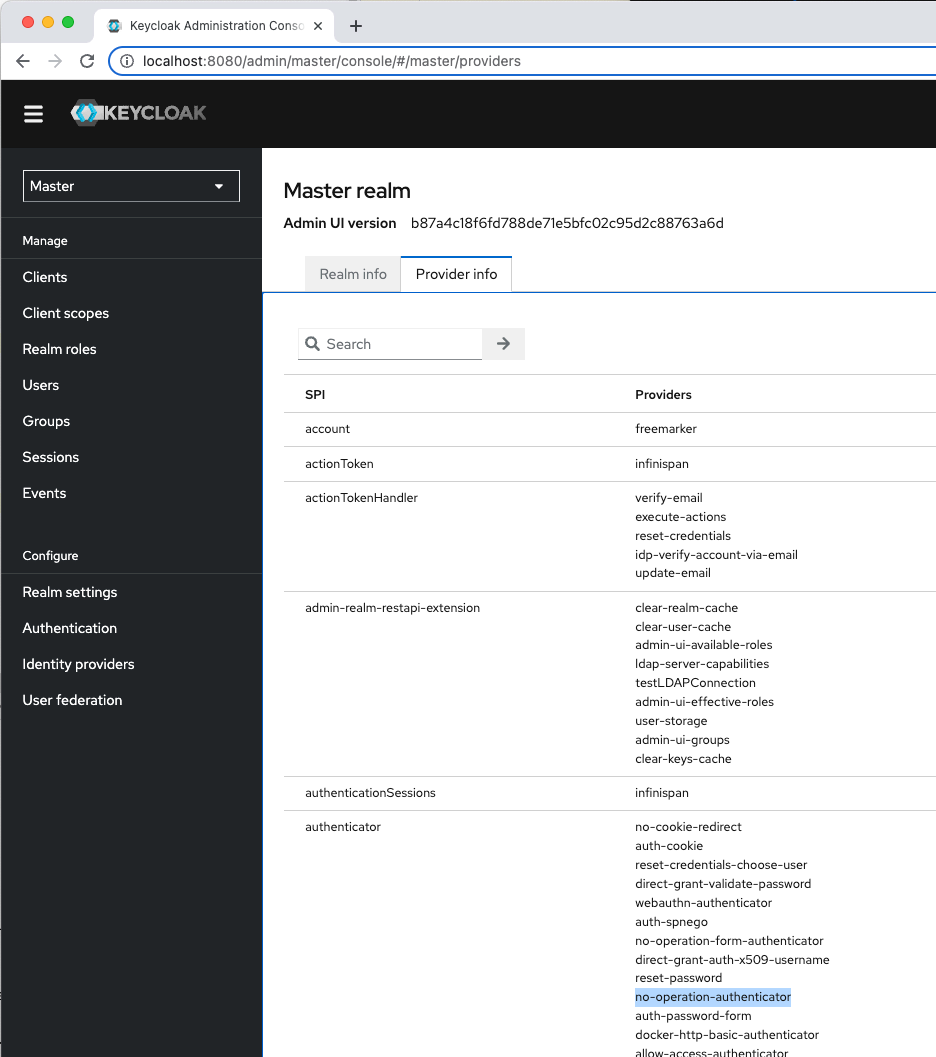
Setup
Because the resulting artefact is copied to ${keycloak.dir}/providers the extension is available when Keycloak is launched from the ${keycloak.dir} directory. But what is missing so far is a new authentication flow, which uses our new Authenticator implementation.
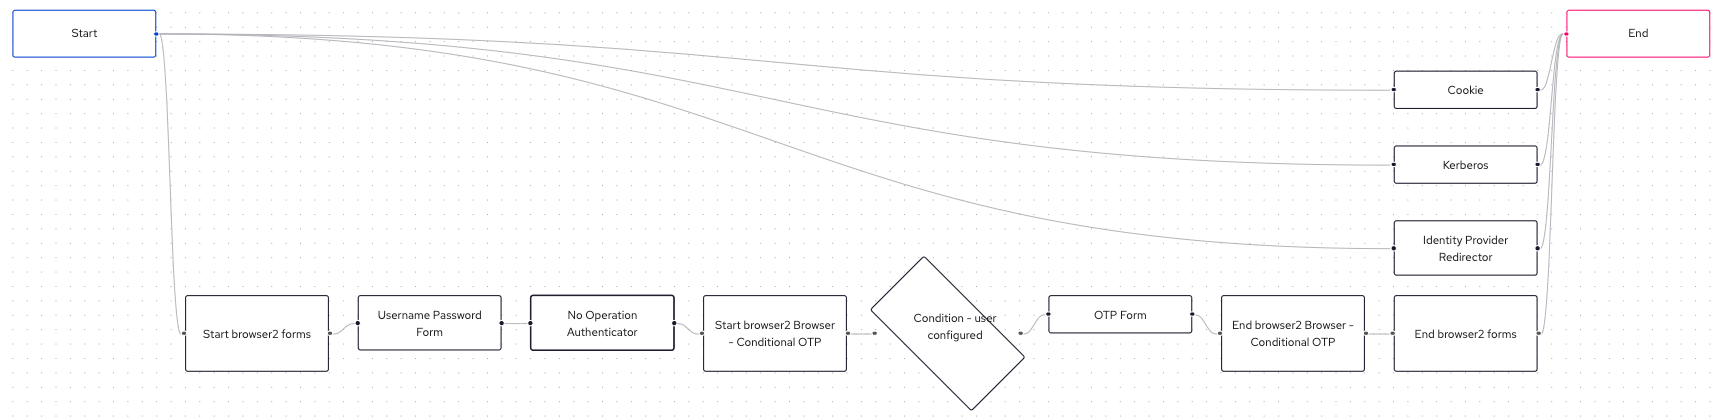
We use the new realm example1 for adding a new authentication flow. The new flow is called browser2. Within this flow, we place our new NoOperationAuthenticator as a new execution after the Username Password Form. The authentication flow browser2 will then look like:
The following excerpt shows the configuration of the NoOperationAuthenticator, which is set by the authenticator field and referenced by the no-operation-authenticator ID. Please see config/src/main/resources/keycloak/setup/realm-example1.json for the complete setup file:
  "authenticationFlows": [
    …
    {
      "id": "5b9b4127-911f-4d5b-b164-0fe3c944487e",
      "alias": "browser2 forms",
      "description": "Username, password, otp and other auth forms.",
      "providerId": "basic-flow",
      "topLevel": false,
      "builtIn": false,
      "authenticationExecutions": [
        {
          "authenticator": "auth-username-password-form",
          "authenticatorFlow": false,
          "requirement": "REQUIRED",
          "priority": 10,
          "autheticatorFlow": false,
          "userSetupAllowed": false
        },
        {
          "authenticator": "no-operation-authenticator",
          "authenticatorFlow": false,
          "requirement": "REQUIRED",
          "priority": 15,
          "autheticatorFlow": false,
          "userSetupAllowed": false
        },
        {
          "authenticatorFlow": true,
          "requirement": "CONDITIONAL",
          "priority": 20,
          "autheticatorFlow": true,
          "flowAlias": "browser2 Browser - Conditional OTP",
          "userSetupAllowed": false
        }
      ]
    }
    …
  ]
And our new browser2 authentication flow must now be bound as the browser flow to be used. This is also done within the realm-example1.json file:
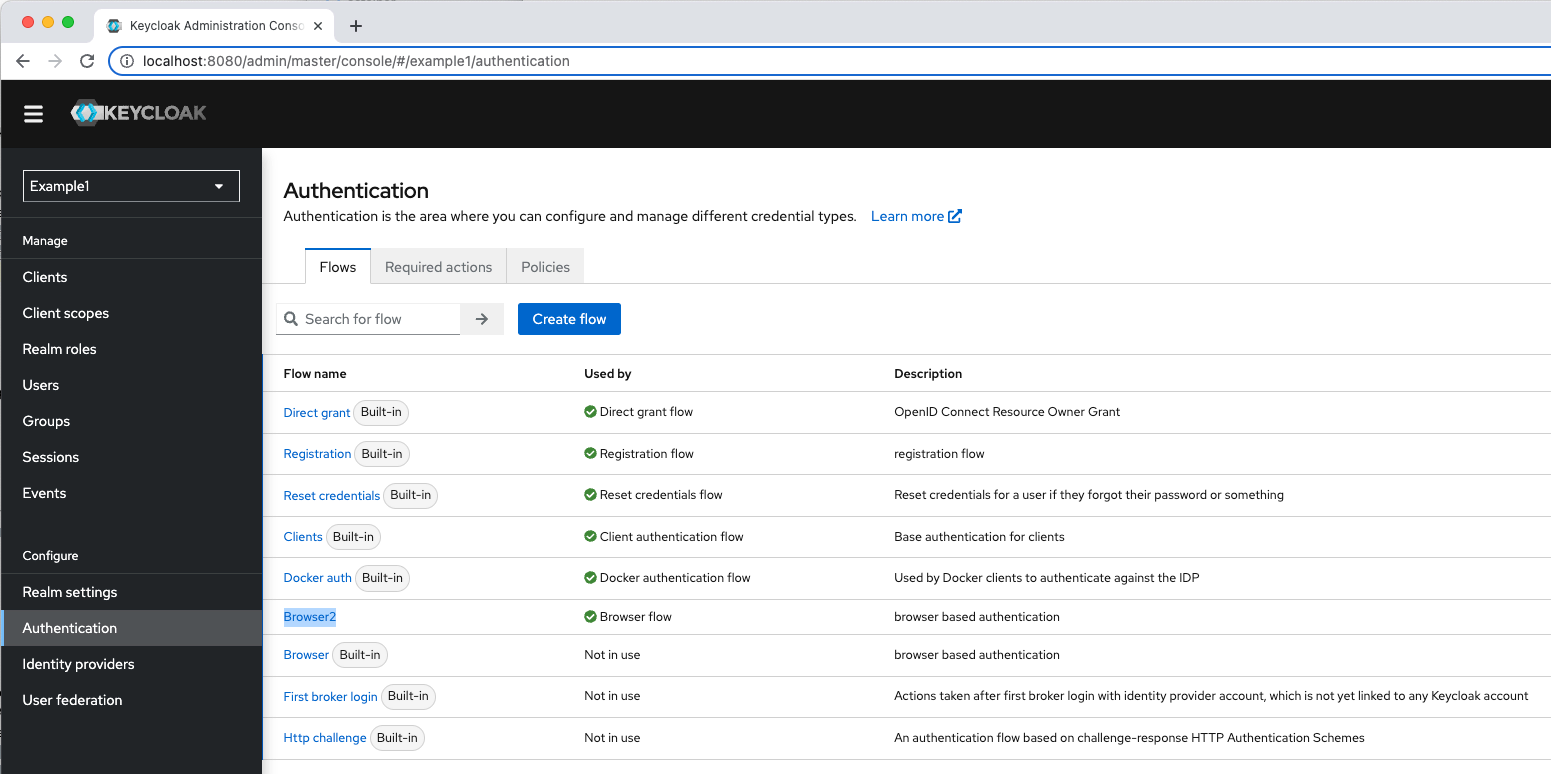
"browserFlow": "browser2"In the Web Admin Console, our new flow shows up in the list as used by the Browser flow. Note that the realm with the name Example1 is selected in the top-left dropdown of the Admin Console.
After applying the new setup, the following log entries are written during a user login:
2022-10-13 13:35:06,859 DEBUG [com.inventage.keycloak.noopauthenticator.infrastructure.authenticator.NoOperationAuthenticator] (executor-thread-121) requiresUser
2022-10-13 13:35:06,859 DEBUG [com.inventage.keycloak.noopauthenticator.infrastructure.authenticator.NoOperationAuthenticator] (executor-thread-121) configuredFor
2022-10-13 13:35:06,859 DEBUG [com.inventage.keycloak.noopauthenticator.infrastructure.authenticator.NoOperationAuthenticator] (executor-thread-121) authenticate
2022-10-13 13:35:09,155 DEBUG [com.inventage.keycloak.noopauthenticator.infrastructure.authenticator.NoOperationAuthenticator] (executor-thread-121) close
To test this new setup, you can use the Keycloak testing application as described in the Quick Start - User Login section.
The log entry for the action method of our NoOperationAuthenticator is missing in the above output. The reason for this, is because we signal already a success in the authenticate method by executing authenticationFlowContext.success().
Step 5: module themes
The module themes provides custom themes. It can be deployed to Keycloak by two ways. Either the content of its src/main/theme folder can be copied to the themes folder of a Keycloak installation, or the resulting jar archive (themes-1.0.0-SNAPSHOT.jar) can be copied to the providers folder of a Keycloak installation.
The two themes inventage and inventage.v2 are contained in this module. They could easily be combined in one theme, but we want to show that also multiple themes can be provided in one module.
Setup
When the themes module is deployed in Keycloak, the themes can be configured to be used. This setup is also done in the realm-example1.json file from the config module.
Excerpt of realm-example1.json:
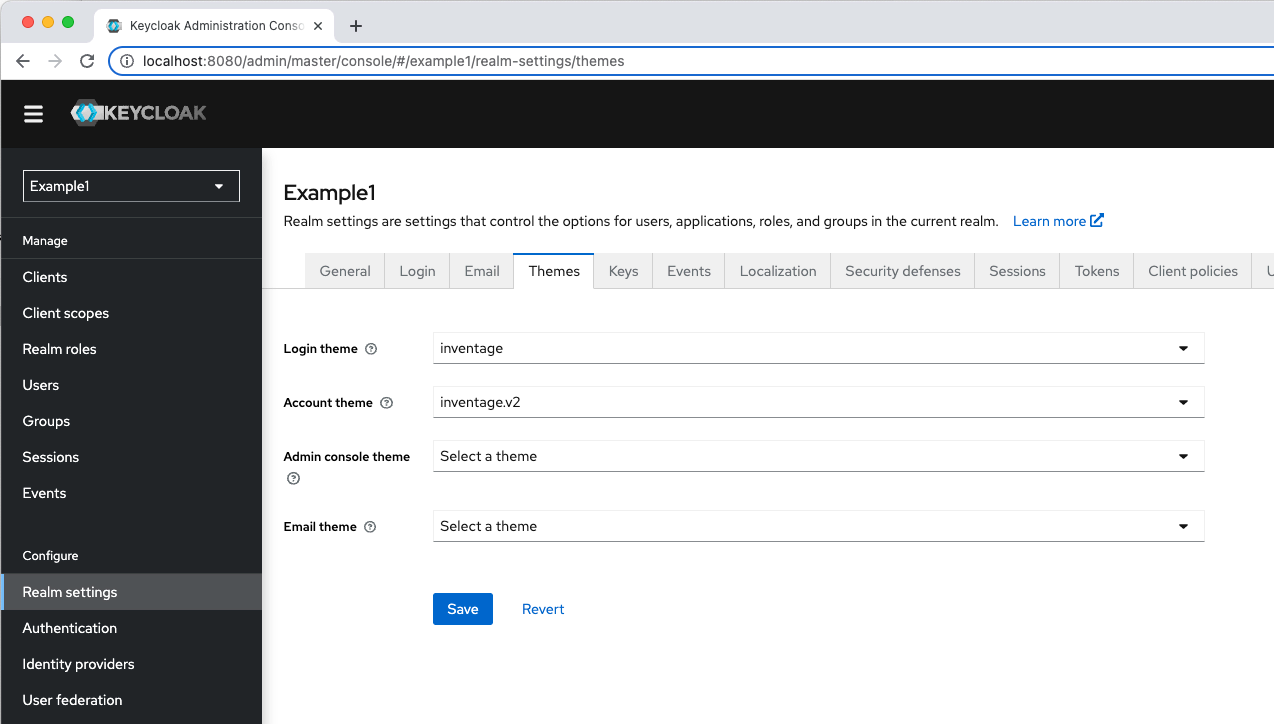
  "loginTheme": "inventage",
  "accountTheme": "inventage.v2",
With the above entries, the theme for the login pages is set to inventage and the theme for the account pages is inventage.v2. The result can be seen in the Web Admin Console:
Now, the login page themed by the inventage theme looks like:
Step 6: module container
In the final step, our custom Keycloak is packaged as a multi-arch container image artefact.
This module uses dependencies to some modules of this project:
- the
configmodule - the
extension-no-op-authenticatormodule - the
themesmodule
to access their artefacts for packaging them into the container image. They are placed in container/target/classes/keycloak.
Dockerfile
We use the Dockerfile at container/src/main/resources/Dockerfile for defining the new container image, which uses the official Keycloak image as the base image. The version used for the base image is also taken from the Maven property keycloak.version.
In the Dockerfile the content of container/target/classes/keycloak is copied, the kc.sh build command is executed to run the Quarkus build stage, the jq tool and the timezone data are installed.
The entrypoint shell script for the container is changed from kc.sh to kc-with-setup.sh, for triggering the setup during the container start-up.
Build
The build uses the io.fabric8:docker-maven-plugin Maven plugin for building the container image during the install phase:
./mvnw clean installFor building also container images, which use a different CPU architecture than the one currently used, we have defined the Maven profile multi-arch. It can be activated by setting the multiArchBuild property with the mvn call:
./mvnw clean install -DmultiArchBuildPlease note that in the case of a multi-arch execution, the build takes a lot more time to finish.
Usage
In this project, we support launching Keycloak from:
- a Java process based on the sources (for easy debugging) within the IDE
- a Java process based on the
${keycloak.dir}from shell script - a container image
The prerequisite for launching the custom Keycloak instance is at least a successful mvn clean install build and a running instance of PostgreSQL. To launch PostgreSQL easily as a container, we provide a docker-compose file. It is located in docker-compose/postgres/docker-compose.yml. The postgres: docker-compose run configuration for IntelliJ is based on this docker-compose file.
Within this docker-compose.yml file, we also expose the port 15432 on the Docker host so that the Keycloak instance can find the PostgreSQL server at this address. If you want to use a different port, you can change the ports: entry in this file. It is worth noting that you reflect the port change as well for the KC_DB_URL property as defined in docker-compose/src/main/resources/keycloak.common.env. This can easily be done by defining the KC_DB_URL property with a new value in the docker-compose/src/main/resources/keycloak.specific.env file.
Java process within IDE
We support run configuration for IntelliJ IDEA.
After opening the Keycloak-Custom project into IntelliJ, you can find some predefined run configurations:
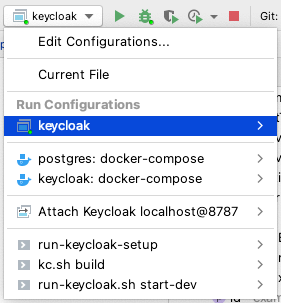
Run Configuration keycloak
In order to start keycloak via run configuration you need to install the EnvFile IntelliJ plugin.
The keycloak run configuration starts Keycloak as a Java process with support for debugging. By this way, breakpoints can be placed anywhere in the code (custom code or Keycloak code) to analyse the runtime behaviour. That is the reason why we use it as the standard way during the development.
Java process from shell script
To launch Keycloak with the properties defined in the .env files explained in step 3, we provide the server/run-keycloak.shshell script. It exports all properties as shell variables and starts Keycloak via the official kc.sh shell script from the ${keycloak.dir} directory.
./server/run-keycloak.shThe server/run-keycloak-setup.sh shell script works similarly. It is for running the Keycloak setup as defined in the config module.
./server/run-keycloak-setup.shRun Configuration run-keycloak
This run configuration is for launching Keycloak from the ${keycloak.dir}. It is based on the server/run-keycloak.shshell script.
Run Configuration run-keycloak-setup
This run configuration is for applying the Keycloak setup from the config module into a running Keycloak instance. It is based on the server/run-keycloak-setup.sh shell script.
Container image
To launch the custom Keycloak easily as a container, we provide a docker-compose file.
Please note: when Keycloak is running as a container, it can’t connect to the PostgreSQL instance by using the address localhost:15432. For such a case, we suggest using on macOS the address host.docker.internal:15432 within the KC_DB_URL property in the docker-compose/src/main/resources/keycloak.specific.env file.
The docker-compose file is located in docker-compose/src/main/resources/docker-compose.yml. You can run the docker-compose command from the project root directory:
docker-compose -f docker-compose/target/keycloak/docker-compose.yml upThe two ports 8080 and 8443 are exposed to the Docker host.
All environment variables are defined by the 3 .env files (keycloak.common.env, keycloak.specific.env and secrets.env) mentioned in step 3.
Run Configuration keycloak: docker-compose
Or use the run configuration keycloak: docker-compose, which is based on the same docker-compose.yml file.